optimize email marketing

I’ve always had a touch and go relationship with our email list. Right out the gate I added every business card I received to my list, but soon the email frequency dwindled and ultimately died when I found that I didn’t have enough content to share! Soon a year passed, then I jumped back into sending emails followed by another 2 year hiatus. Each time I started sending emails, I received positive feedback from my list, increased traffic, and most importantly, new sales. the downfall was that I also alienated individuals because they simply forgot who I was. Learning from my years of wasted opportunity using my email list, I’ve learned some very valuable lessons that can help you kick start your email marketing most effectively.

Below I’ve outline the 4 steps to email marketing: Building your list, Writing your email, Optimizing your subject line, and Mistakes to avoid. You’ll notice as you read through that subject lines and consistency do appear most frequently in these steps. Being consistent is half the battle and once you have an email marketing program in place, optimizing your subject line can have the biggest effect on the open rate and sales from your emails.

STEP 1: Building your Email List

While everyone is focusing on building a strong social media presence, others tend to forget about the importance of email.

Your email list plays a big role in your marketing campaign. It can help you build relationships with your target audience, generate buzz about your business and attract new customers. That said, it makes sense to continuously grow your email contacts.

Interested to grow your email list and grow your subscribers? Then you came to the right place. In this blog post, we’ll be sharing with you some effective strategies on how to get more email subscribers. Follow the tips below to get your first 1,000 subscribers.

Place a subscription box on every page of your website

Most website owners think that people would first access the home page before navigating through the site. But that’s not always the case. They may check your products, scroll through the “about us” section or any other page on your site. You can use your website to generate more contacts by adding a subscription form where your visitors can sign up. Be sure to place the form at the top of the page to make it easier for people sign up. Survey revealed that sites that place sign up boxes as part of their top banner perform better as compared to those located at the footer area. In order to get people to subscribe to your newsletters, make sure your sign up box is a prominent feature of your website. The more visible it is, the more subscribers you’ll get.

As a marketer, you need to answer the question most people ask: Why would I subscribe to your email list if I can just follow you on Facebook? To urge people to subscribe to your newsletters, let them know that you offer subscriber-only content. Also, don’t forget to mention how often they’ll be receiving emails. Setting expectations upfront helps reduce unsubscribe rates.

Tip: I’ve decided upon ConvertKit as my go-to list building tool. It is a very straightforward interface to create forms, landing pages, incentive downloads, and corresponding sequences. Additionally, there is quite robust tracking, a definite plus! You can learn more about ConvertKit Here (*affiliate link).

Content is king

You won’t have a hard time getting people to sign up for email updates if you have great content on your site. As a marketer, it is your responsibility to constantly supply your readers with fresh, relevant and informative content. The best marketers for your products or services are the people who are already using them. For subscribers who have been on your list for a very long time, a discount or a small incentive would get them talking. Encourage them to share your list with their family and friends.

In Practice: Don’t just assume that you can’t reuse your blogs, correspondence with clients, or recent presentations. ALL of these have the potential to make in-depth content that can then be shared as resources, email campaigns, social media posts, videos, etc. Check out this guide on Repurposing Content as it can save you time and energy as you increase your online exposure. 

Social networks

Another way to build your list is by using social networking sites like Facebook and Twitter. Due to the viral nature of Facebook, it pays to add a subscription form on your page. Be sure to include a sign up link to your email list on the “About” section of your page. For an added boost, you can also add it on your personal account and tell your family and friends about it.

Offer an incentive

People love receiving free stuff. If you can give them something like a free trial of one of your products, a free ebook with useful information or access to an exclusive video, you’ll make an impact to your target audience. When done correctly, it can help you build a relationship with your audience and grow your email list.

Your offer should be interesting enough to your ideal customers. Find out more about your target audience and know what’s keeping them up until 3:00 am.

In Practice: My main incentive offer is our Free Resource library. You can get to this a few ways – either the link in our navigation or from the home page. Making this very obvious for site visitors increases the number of new email subscribers you can receive from your website.

Run a contest

Social media contests are one of the most effective ways to get email addresses from folks who want to hear from you. You are free to hold whatever contest and on any social media channel you want. But since majority of the adult population has a Facebook account, you might want to start there. Also, ask people to enter their email address in order to participate.

STEP 2: Writing your Content

Tips to write better email | write better email marketing for business

You’ve spent a significant amount of time writing an email that people will hopefully open and read. You’ve racked your brains for the best subject line. You’ve polished each sentence. Now, you’re finally ready to hit “send”. For some reason, you aren’t effectively grabbing the attention of your audience. You’re not getting a response from them either.

This blog post looks at strategies to help you craft an effective email marketing copy that converts. Follow these tips to ensure that your email is effective, clear and successful.

Write a meaningful subject line

Most professionals receive 50 to 200 emails a day. With that volume of email, it can be easy to overlook some important messages. If you want your email to be opened and read, then write an informative subject line that will give recipients an idea about the content of the email.

A clear subject line will capture the attention of the receiver and give busy professionals a concrete reason to read the message. Take a moment to write a subject line that accurately describes the content before you hit “send”.

A newspaper headline has 2 functions: 1. it sums up the content of the article; 2. it captures people’s attention. Based on this headline, you can decide whether or not you want to read the article. Your email’s subject line should also do the same thing.

If you have a very short message to convey and can include all the information the person need in the subject line, even better.

Struggling to write a subject line? I recently wrote a post with tips to create an award winning headline here

Keep it simple

People are more likely to read short and concise emails. Keep messages clear and brief. Use as few words as possible, but make sure that it contains all the important information. Also, focus on one particular subject per email. If you need to talk about a separate topic, then write another email.

We’re all busy. And if someone opens your email, this is your chance to get the message across. Don’t ruin it with poor content.

No one wants to read a long, ambiguous email. So get to the point and keep your word count low. Also, use simple English and steer clear from technical lingo.

Be personal

Just as you would in a letter, it is polite to add a salutation before jumping straight into the text of the email. But be sure to address the person appropriately.

If you are sending an email to a prospective client, then you want to address him as Mr. Johnson. Meanwhile, if you are writing to a friend, starting the email with Dear Mr. Johnson would be too formal. In this case, “Hi Bob” is the best way to go.

Email is usually the way professionals communicate, but that doesn’t mean that you should sound like a legal document or a spammer. The content should feel as if it came from actual human being, not a machine. While it’s good to keep the message short and brief, including a personal note can help warm up the conversation.

Tip: Back to ConvertKit (or any other CRM).. make sure that you are trying to capture both the first name and email address of your subscribers. Then, whenever possible, use the NAME embed code to automatically personalize your emails. 

Proofread

Your emails are a reflection of your attention to detail, values and professionalism. The last thing you want is to send an email that contains embarrassing spelling mistakes, horrible grammar mistakes, lack of proper greetings or one that is written in bright colors. Make sure you edit and proofread your email for grammar, spelling and punctuation mistakes before sending it.

STEP 3: Increase your Open Rate

Tips for businesses to increase open rates with email marketing

Email marketing is considered as an important part of a business’ marketing campaign. It has one of the most effective ways to engage with your prospects and customers. Plus, it provides the highest returns on investments.

Open rates give you an idea as to how your campaign is doing. If the open rate for your email program is better than the average, then good for you. But if your open rates are getting worrisome, you might want to look for ways to improve it.

Here are some easy ways to increase your email open rate.

Create an interesting subject line

If there is one opportunity to convince recipients to read the email, it is the subject line. After all, it is the first thing they see on any email. Your subject line must be clear and concise. It should tell readers what to expect from the email.

A good subject line is the key achieving better open and response rates. Since most people receive several emails in one day, they only need a few seconds to decide whether or not they’re interested to read the email. If your subject line is not interesting enough, people are less likely to read it. Also, make sure that your subject line is short enough that recipients will be able to read it at a glance.

Make it personal

You’ve spent so much time collecting people’s first name and email address, now is the right time to put them to use. Personalization has been proven to drive engagement and convert more leads. It is also a good idea to send your emails from a person or an employee, rather than from the company.

Studies show that subject lines that contain the first name of the subscriber boosts open rate every time. This is a subtle trust builder and an instant attention grabber. Make sure you personalize subject lines with first names.

Timing is key

Timing is everything in marketing. If you send emails too early in the morning or too late at night, they can get lost in the shuffle of other emails. If you send it too late in the afternoon, they may decide to put off reading until the morning since they might be too busy accomplishing some tasks before going home. The best time to send emails is during lunch or after work, when you know they’re reading.

If your campaign has a B2C focus, your audience may have time to check their emails after work or during lunch break. If you are running a B2B campaign, it might be best to send emails early in the morning or in the afternoon. Your goal is to send an email exactly when the recipients are checking their inbox.

In Practice: Honestly, every business and every tribe is different. You may find that your emails with promotions receive the highest open rates on Tuesday’s, but your newsletters sharing blog posts have the highest open rate on Sunday’s. One recent study stated that Friday emails had the highest open rate, but Saturday emails had the most conversions. MailChimp has another study that states Tuesday and Thursday are the best to send emails. It really just depends on your market and your promotions. Don’t be afraid to play around with different days of the week and times of day. 

Be consistent

Send too frequently and you may end up losing subscribers. Send too infrequently and you may cause your readers to stop interacting with your email. Send your emails at a consistent frequency to build your email reputation. A good rule of thumb is to send no less than 1 email a month and no more than 1 email a week unless it is for a specific promotion.

Clean up that dusty old email list

Most businesses are so determined to expand their email list that they tend to ignore the open rate. It doesn’t matter if you only have a small mailing list, as long as it is filled with engaged subscribers. It’s a good idea to remove inactive subscribers periodically.

STEP 4: Email Mistakes to Avoid

Email marketing mistakes to avoid for small business

Email marketing isn’t dead. In fact customer acquisition has quadrupled over the past 4 years. This goes to show how effective email marketing is for small businesses. That’s great news, provided that your emails are being read by the recipients.

In order to make sure that you’re getting the most out of your marketing efforts, you have to focus on what’s killing your open rates and find a way to fix them. While some mistakes are harmless, the following mistakes could be costly.

Poor frequency

While a flood of emails may distance the customer you’re trying to attract, the same reaction can also be expected if you send emails on an inconsistent basis.

Have a consistent enough cadence that your subscribers would be thrilled to receive an email from you, yet relaxed enough that they don’t wonder whether or not you’re still sleeping at night.

Forgetting to send emails at important events

The introduction of new products or services, promotions and events your business will be holding are some examples of email worthy announcements. If you have an important event to cover, make it a point to create a multi-email campaign around it.

Tip: I always recommend clients put together a content calendar as a way to visualize their entire year. In our model, as presented in Blogging Your Business, your blog is at the center of your marketing efforts. You want to make sure your blog posts are Timely, Relevant, and Authentic. This content then can be shared across all of your other marketing efforts from social media to email marketing, and even offline presentations. Creating the content calendar keeps you aware of external events and holidays that can affect your business. 

Poor subject lines

Subject lines are your first impression to every email recipient. They have to be clear enough that people know why you’re sending an email, short enough that they fit the screen of tablets and smartphones and enticing enough not to give away the entire email. Also, be cautious about using words and phrases that could mark your email as SPAM.

Unreliable email list

Whether you’re emailing inactive subscribers, not removing hard bounces or collecting bad data, having an unreliable email list can affect your open rates.

The key to a successful email campaigns is clean data. Make sure that all customer information is valid and up to date. Hard bounces should also be removed from your database.

Additionally, 43% of email recipients click the spam button based on the sender email address and name. So, it’s extremely important that the recipient knows who you are and are expecting to receive emails from you.

Optimize email marketing | Email marketing tips | How to use Email Marketiing | Email marketing for business


video marketing getting started

This guide from Animoto breaks things down to show you how easily (and quickly) you can get started with video.

Intimidated by video marketing? Animoto has broken things down so you can easily and confidently start promoting with video.

Download the free guide to learn why video marketing is essential and how to determine your video marketing objectives and goals. You’ll find inspiration for video ideas from 5 real-life businesses, tips for shooting, editing, distribution, and more.

So what types of business videos can you create?

We recommend creating Brand Videos, Expertise Videos, Product Videos, and Ad Hoc Videos.


Download Video Marketing Guide

How to get more twitter followers

This resource originally was published by Hubspot.

So you’re new to Twitter. You’re in the right place. But first, it’s important to understand why your followers matter for driving engagement with your business online.

When someone follows you on Twitter they are opting-in to see your Tweets. They’re the ones who will see what your company is like, what you company offers, and what your company thinks is interesting. They’re also the people that are likely to become brand advocates and will be engaging with your content through likes, Retweets, and mentions.
Getting followers isn’t really your end goal. Your end goal is to get people to engage with your Twitter content, thereby engaging with your business, and eventually becoming loyal customers.

When you gain followers on Twitter, it helps you get more customers. And it works! In a Small Business Customer Insight survey, Twitter found that 75% of customers feel more positively about a business after following them on
Twitter, and 69% of customers said they have purchased from a SMB after following them on Twitter.

This Ebook, published by Hubspot, covers the steps for you to take as you build and grow your Twitter Following.

Click Here to Download Ebook

Facebook and Marketing

We’ve all heard that we need to have a presence on Facebook for our businesses, but what does it actually look like? Over the years, Facebook has turned from a free marketing platform that was easy to grow to, to one where only about 16% of your Likes will see any give post.

Recently, we’ve seen a lot of businesses turn away from even wanting to market on Facebook, but it still is an essential network for your business big or small. In this blog, I’m going to take a look at the important steps to build a viable Facebook marketing strategy, dos and don’ts of Facebook for business, and little-known tips to make sure your business sees a return on your investment in Facebook marketing.

Building your Facebook Strategy

Facebook, just like any modern marketing avenues, is much more than just sharing a piece of content. Our tribes are composed of smart individuals who no longer want to be told what to do, but appreciate brands that help them to discover new, meaningful things. Facebook, luckily, is the perfect avenue to increase our presence and set ourselves apart from competition.

Step 1: Complete your Business Page Profile

Your profile picture, cover photo (or cover video), and about section of your business profile create the first impression your business gives to your Tribe on Facebook. It is very important that these elements are all completed mindfully, rather than just putting up the first thing you see or think of.

Let’s start with your profile picture.

Your business profile picture should be an easily recognizable image that conveys who you are  as a brand or company. Many solopreneurs, freelancers, or businesses with an individual as the face of the company should and can get away with using your headshot as the profile picture. On the other hand, businesses that have a brand identity should use their business logo as the main profile image. The Facebook Profile picture is the thumbnail image that appears next to all of your social media posts, comments, and messages, so it is important to take your time and choose this image wisely.

A little later in this post, I’ve included an infographic from TechWyse with the  exact dimensions of each type of image you can use on Facebook so you can be sure your pictures always appear crisp and clean. A profile picture should be 170px by 170px.

Next we have your Cover Image.

Facebook just recently changed the cover image so you now can also include Videos! This exciting change can really help your Facebook Business Page stand out among competition. Your cover image is prime real estate on your Facebook page. It is wonderful space to highlight a marketing campaign, seasonal offering, or exciting news for your brand.

In this image or video, you can include a call to action, and even entice individuals to use the buttons directly below the image to Contact you, Claim an Offer and more!

Businesses that coordinate their cover image, profile picture, and pinned or promoted posts see a much greater return from their Facebook pages than those who don’t.

BIMS-cover-photo

Your About Section

All too often, we see businesses with incomplete About sections that link to old websites and don’t fully explain their business service offerings or their brand promise. The good news is, once you have this written correctly the first time, you can reuse it or similar content for other social media networks.

A preview of your About section appears below your profile picture, so it is important to make sure this information is relevant accurately conveys your brand. Companies with ill-planned About Sections on Facebook are doing themselves a disservice. Try playing around with the language you use and measure the responses to those changes.

In your About section of your Facebook Business Page, be sure to describe your business, use keywords, and include a call to action to get people liking your page or heading to your website.

[clickToTweet tweet=”Three steps to creating a income-generating Facebook marketing strategy #FacebookMarketing #TheBIMSTeam” quote=”Three steps to creating a income-generating Facebook marketing strategy #FacebookMarketing #TheBIMSTeam”]

Step 2: Posting to your Facebook Business Page

As you begin posting to your Facebook Business Page, it is important that you follow a strategy to remain on point and brand. It always surprises me when some business owners still want to post only about their business. The truth of the matter is that 80% of your Facebook posts should be about something other than linking directly back to your website. The other 20% can be blogs, promotions, and information about your company and business.

By sharing information that is not directly linking back to your website, you are helping to show your authority in your niche. You are sharing resources that your market can benefit from, quotes and images that can engage your tribe, and more generally, information that will interest your followers.

When you are posting, think about:

  • What other businesses are in your space
  • The information that will appeal to your market
  • Things you are passionate about in your business
  • Other influencers with whom you could engage

Then, create a plan for how you will share your content. Make sure you include:

  • Videos
  • Images
  • Tips
  • Quotes
  • Questions
  • Calls to Action
  • Throw back posts
  • Educational Articles
  • Your blog posts

Lastly, use this infographic to make sure all of your images display properly in your Facebook Business Page posts.

Facebook Cheat Sheet | Facebook Image Sizes | Image sizes for Facebook Marketing | Facebook business page image sizes | Guide to Facebook Marketing | Facebook for business | Facebook tips

Step 3: Growing your Likes and Engagement on your Facebook Business Page

It is great that you are now posting on your Facebook business page and following a strategy, but how do you actually grow your Likes and Engagement? These tips will help you to make sure that your business is on its way to a profitable Facebook presence.

Invite your Email List and Personal Friends to Like your Business Page

Many business owners with whom we work are nervous about sending an email to their email list or inviting their personal friends to Like their business page. You’ll be surprised, however, to see how many people respond to your request! As someone who often keeps my personal life and business life separate, I forget that many of my personal connections may actually be interested in learning more about digital marketing or may be starting their own business.

Facebook makes it very easy to invite people to Like your page. If you go to your Page and scroll down, on the right side of the screen you will see a box that says “Community”. In this box, there is an option to “Invite your friends to like this Page.”

community-box-on-Facebook (1)

When you click this link, Facebook will prompt you to select the friends you would like to invite to Like your Facebook page.

With your email list, I recommend sending an email rather than utilizing Facebook. In the email you can explain some of the perks of Liking the Facebook page and what people can expect from following your account.

Share your posts to your personal profile

Another way to increase your page Likes and to gain more engagement is by sharing your business posts to your personal profile. While I don’t recommend sharing every post, consider sharing your blog posts, videos, and images that represent your brand and personal values. These posts won’t come across as you trying to sell to your personal relations, but that your goal is to better educate them on what you do and your industry.

If you work with a team, you can even ask your employees and contractors to Like, Comment, and Share posts that relate to them, as well.

Boost Posts and Run Facebook Ads

I won’t go into much detail here, as this would create another LONG blog post, but using Facebook ads and boosting your Facebook posts is a great way to increase engagement. Here I recommend playing around with boosting the post to:

  • Your current page Likes
  • A custom audience made of your email list
  • Specific targeting of your tribe’s demographics.

Facebook’s targeting options are incredibly advanced, so just like with any sort of marketing, I recommend testing very specific niche’s rather than typing in everything demographic or psychographic identifier you can think of. This way, over time you will be able to more easily tell which interests or job titles, for example, lead to the highest number of new likes, follows, shares, and comments.

Post share-worthy content

Of course this needs to be listed. I’ll go into more detail below, but one of the most important pieces of your strategy to gain traction on Facebook is to post content that people want to read and share. This means that in addition to finding other articles and resources, you need to be making these for your own website, too. Take your time and really come up with pieces of content that will WOW your tribe!

Not sure how to create a content calendar for your business? Take a look at our Free Master Class on Finding Topics your Tribe will Love!

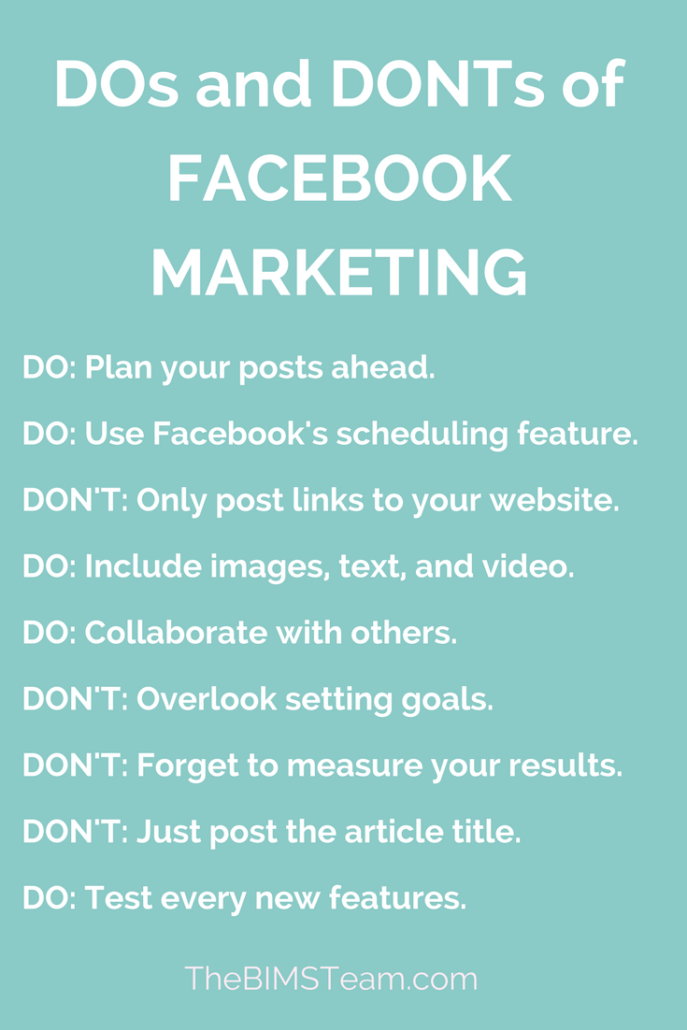
Dos and Don’ts of your Facebook Marketing Strategy

Your Facebook Marketing strategy needs to change as Facebook makes changes to it’s algorithms and adds new features for business owners to take advantage of. Regardless of the nuances of Facebook’s algorithms, there are some items that you need to be sure to include in your Facebook marketing strategy. Above, I reviewed some of the steps to create a Facebook marketing strategy for your business, but here I will be highlighting those items you must include and the common pitfalls of business owners as they jump into Facebook marketing.

DO: Plan your posts ahead. Just as with other marketing strategies, you never want to be stuck wondering what you will post the day something needs to go out. It is better to plan ahead, even if it is for the entire month, rather than coming up with posts on the fly. This way, you will be sure your Facebook posts align with promotions, holidays, and other important events in your business. One way to do this is by using this free editorial calendar to manage your calendar!

DO: Use Facebook’s scheduling feature. I absolutely swear by tools like Buffer.com and Hootsuite.com for scheduling social media posts, but on Facebook, it is more advantageous to schedule your posts out directly through their publishing tool rather than a third party. Yes, you can still incorporate some posts scheduled with Buffer, but a majority of your posts, especially those specifically about your business or from your blog, should be published directly through Facebook. Why? These posts have been proven to reach a wider audience than those that are scheduled through a third party.

To schedule a post on Facebook, write the post as you normally would, but rather than clicking “Publish”, select the drop down carrot to its right and select “Schedule”. One perk of doing this is you can play around with the different types of posts you use from multiple images to galleries, slideshows, and carousels.

DON’T: Only post links to your own content. Talk about boring, right? Our tribes are too smart to follow businesses on Facebook that only talk about themselves. Marketing is no longer a one-way street. It is about building a community around your brand. And to build a community, you need to set the example by listening and sharing rather than just pushing information.

DO: Include images, text, and video in your posts. The more diverse your posts, the more likely you are to capture your audience’s attention. You can use Facebook’s slideshow creator to build short videos with music and captions for your Facebook posts if you don’t have software on your computer to create your own from scratch.

Better yet, try a Facebook Live event and put yourself out there as the face of your brand every week as a way to engage your audience in a whole new way!

DO: Collaborate with other businesses on Facebook. Start reaching out to businesses that are similar to yours or who work with the same individuals you do. By commenting, sharing, and collaborating with them, you are introducing yourself to their audience and helping to boost both of your businesses in the process.

DON’T: Overlook the importance of setting goals. When we set  goals for our business, we have a very clear sense of how to understand what is working and what is not working with our strategy. It allows us to aim for something rather than just taking successes and failures in step.

DON’T: Forget to measure your results. You can’t set goals without the following step of measuring your results! Luckily there are incredible, and free, tracking services available for you online. The top ones we use are Google Analytics, Facebook Insights, and Pinterest Insights. The rational here is to see how your efforts have effected your movement towards achieving your marketing (and Facebook) goals.

DON’T: Just post the article title as your post. Say something meaningful about what readers will find if they click the link or take a quote from the article that highlights your main takeaway. Though titles should be descriptive, the same content will appear directly below your post in the link display.

DO: Test the effectiveness of Albums, Slideshows, Carousels, and single Thumbnail images if you are linking to something with many images. Each of these different types of posts will lead to a different response from your followers. We have a photographer, for example, who posts a link with a thumbnail when she first edits a wedding album and creates a blog post as a first peak. Then, she creates a slideshow to reengage the couple and their networks once all of her edits are complete and the couple has access to the images.

Dos-and-donts-of-facebook-marketing-687x1030


Little-known tips to make sure your business sees a return on your investment in Facebook marketing

Facebook is always changing, so it is necessary to take a look at some of the lesser-known strategies on Facebook that maybe you haven’t considered for your business. Some of the strategies below are ones you have seen others implement, while others may be brand new!

Facebook Groups for you Clients and Prospecting

Most users on Facebook are a part of numerous Facebook Groups. These groups are great for your business for a few different reasons. One point to emphasize here is that the groups run through your personal profile rather than your business page. Make sure your personal profile on Facebook links to your business page, is branded with a professional picture, and has the proper security settings.

  1. Joining other groups in your niche provide an avenue to position yourself as an expert and to meet new prospects for your business. I recommend finding 1-3 groups that are active on Facebook and seeing if you can share information that the members will benefit from. Many groups have guidelines about selling to members, but providing valuable information is always appreciated.
  2. Creating a Facebook group or groups for your clients. This can be a great add-on to your services or courses that you run online. Because only paying customers have access to the group(s), you will be more motivated to participate and engage.
  3. Think twice about creating a group for your email list. Recently, many very successful Facebook group managers have been shutting down their ‘public’ Facebook groups. They find themselves spread too thin to really focus on the public group and the specific groups for their clients. I recommend starting small and being engaged with your paying customers rather than trying to create a huge group to prospect from.

Create Custom Audiences when your run Facebook Ads and Segment!

Running ads on Facebook can transform your business or they can be a waste of money. One of the most successful ways to see an ROI from your Facebook ads is by being very niche focused and targeting specific people. By this I mean:

  • Upload your email list and promote posts or specials directly to the list
  • Add a PIXEL to your website and integrate retargeting to your website visitors. You can set the campaigns up to only target people who are been to specific pages on your website. For example, you can show ads only to people who viewed a specific landing page or who downloaded an ebook.
  • Use look-alike audiences to find other individuals who are similar to the people who have responded to your ads.

When you create the audiences and run the Facebook ads, make sure your offer, image, and landing page all are in alignment. Your tribe will pick up if things seem disjoint or like you are targeting too wide of a net.

Add a Video to your Facebook Page Cover Image

This new feature can transform your engagement on your Facebook business page. Guidelines for Facebook Cover Videos are below:

  • Video Dimensions: 820 x 312 pixels
  • Length: 20-90 seconds and can look
  • Sound: Though you can include sound, Facebook automatically mutes the video for user experience

So, what should you do now that you can have a video as your Facebook Cover? Try creating a slideshow video or a quick iphone video that captures your brand. This can be simple to start, but the movement when someone first goes to your business page is sure to keep folks on the page for longer and be more engaging. You can also test out interview style videos or webinar style videos are your cover video.

Wait to Boost a Post

As you can tell, I am all for businesses using Facebook ads to increase the engagement on posts and the traffic to your blog or landing pages. When you plan to boost a  post, hold off on pressing the  Boost button until the post has had a chance to gain organic exposure first. This organic exposure can really help with gaining more traction and keep your costs  down.

Test out Lead Ads

These ads are incredible! If you have a content upgrade on your site or can automatically register people to a webinar, the Lead Ads may work well for your business. Basically, when you create the ad, you also create a form. The form can then be set up to capture someones name, email, and other information. When a user fills out their information, they will be redirected to a page of your choice. For example, you can direct someone to the ebook download page on your site, or to a webinar sign up thank you page. These ads can also be to build your email list.

We’ve found these ads to have a much lower cost per conversion than a lot of other marketing efforts.Get-quote-by-landrover-ad


Schedule your Facebook Posts

Now you shouldn’t always schedule your Facebook posts,  but if you are like most business owners, you are pulled in many directions and hoping on Facebook every day may not be realistic. I  recommend using Facebook’s scheduling functionality for most of your Facebook posts as a way to batch your efforts. Take one day a month and find all the relevant articles, make all of your custom images, and schedule your promotions to be published in advance. Then, as you write blog posts over the course of the month and have other items to share on a daily basis, you can log in and specifically share that content.

We used to always use Buffer for scheduling content for clients, but have found a higher level of engagement when posts are created directly through Facebook.

Add a Call to Action Button to your Page

This is fairly easy to implement! Most of the time we see our clients create their CTA when they first set up their business page. If you haven’t already, however, go to your Facebook business page and click the blue button that states “Add a Button”. Here you can select your CTA and a landing page for any user who clicks the button. Tracking is available through Facebook Insights.

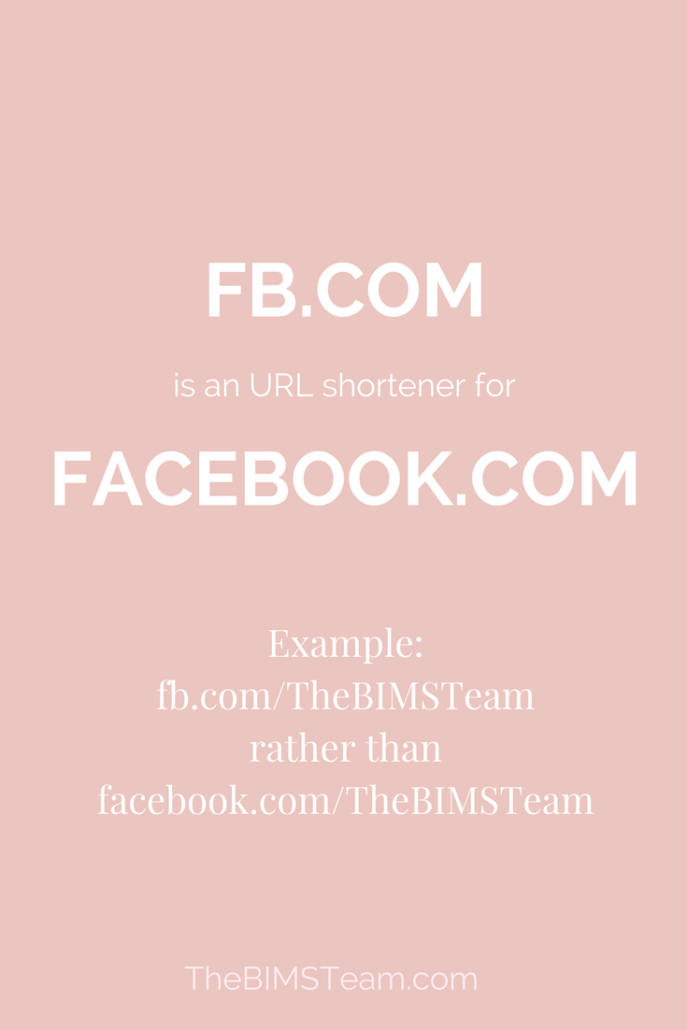
Use fb.com as a URL shortener rather than typing facebook.com

Surprise! fb.com is a URL shortener for all facebook.com addresses.

Use FB.com as a link shortener for your #Facebook Page in your Digital Marketing

seo not working

This post was originally published on Moz.com. Welcome to the sixth installment of our educational Next Level series! In our last episode, Jo took you on an adventure diving for treasure in the long tail of search. This time around we’re answering the call for help when you feel like you’ve done all you can, but you’re still not ranking. Read on and level up!

You’ve optimized your pages, written delightful title tags, concocted a gorgeous description to entice clicks, used your target keyword in your copy with similar words, and your content is good, like really good. As far as you’re concerned you’re doing everything you can on that page to say to Google “This is relevant content!” But, lo and behold, you’re not ranking.

Frustrating, right? Well, no more. I’m going to show you how you can discover what’s holding you back, and how to make sure your site is a lovely big target for visitors, just like this happy fellow:

You’ll learn some tricks you can do in your browser and then we’ll speed things up with some cat magic and pixie dust to sprinkle all over your site.

To start, pop open these tools in another tab so you’re ready to go:

Dreamy!

Step 1: Put in a quick call to Google

Well, you could try to call Big G (that’s what I like to call Google sometimes, just for kicks), but you may have better luck phoning yourself from 1995 with the idea for Google — then you could fix the rankings in your favor. Totally worth it.

Hello, operator?

Instead of messy and possibly future-altering time travel, you can put a call in by running a search operator like this:

site:yourfabsite.com
site:yourfabsite.com/blog
site:yourfabsite.com/blog/my-site-rocks

It’s like saying, “Hey, Big G, show me all the result you have in your index for yourfabsite.com.” This is what you don’t want to see:

If you’re seeing the above, you won’t be able to rank because your site isn’t indexed. It’s got to be indexed before it can rank, and it’s got to be crawled before it can be indexed. Trying to rank without being indexed is like applying for a job and forgetting to attach your CV.

Search Console is here to console you

In the results page above, Google is directing you straight to the Google Search Console.

Not quite as fun as Xbox or as comforting as a hug from a loved one, Google’s Search Console is still pretty sweet all the same.

Go — right now, right, right now, don’t read any more, you should have already gone — go and set up your Search Console. Once you’re all set up and your site is verified, you can go to the page that I like to think of as the Fires of Mount Doom and throw in your precious.

https://www.google.com/webmasters/tools/submit-url

Don’t worry, that analogy doesn’t hold up. It won’t destroy your site. 🙂

Head to “Google Index” and then “Index Status” to see the data similar to what we looked at above, but in graph form! Definitely handy for tracking how your pages have been indexed over time.

If your site is not being indexed, you’re going to want to take a closer look at your robots.txt file. Check your Search Console Messages to see if there’s a reason Google couldn’t index your site. If Google can’t access your robots.txt file they’ll stop indexing to avoid crawling pages listed there.

Step 2: Find out where you’re ranking

Now that you know your pages are being crawled and indexed, you want to get them to the top of the results where they gosh-darn-well should be, right?

Find your rankings with your bear hands

Yes, I DO mean bear hands. This is a manual job and your soft, tender, indoor keyboard hands just won’t do. So attach your bear hands and start digging. Search Google for your brand name, primary keywords, secondary keywords, words, and phrases you used on your page (one at a time, of course). Feel the ache in your chest as you scan the page: “Where is my jazzy title? My tantalizing description? My adorable URL?”

Turn up the volume

Not finding your site on the first page? Instead of clicking through to the many ooooos of Google, we’re going to change the settings in your browser to show 50 or 100 results per search so we can view more results with every search. I’m going to want to see A LOT more pet costume results, so I’ll click on the gear icon in Chrome and hit “Search Settings,” then toggle up the “Results per page”:

Now we’ve got a whole page of 50 or 100 results to search through. Use CMD + F for Mac (or CRTL + F for Windows) to search for your domain.

This process is great for doing a quick check to see if you’re in the top 50 or top 100. Remember that your browser can return personalized results when you’re logged into Google, so log out and enter incognito mode.

Like any good detective, make sure you record the keyword, position, and URL in a spreadsheet for Future You to discover and applaud Present-Day You on your fabulousness.

Start cooking with gas

Manual searches aren’t for everyone. I mean come on, we work in technology — we don’t want to be lugging keywords around the hot, dry Google search page, plugging them in one after another. I hear ya buddy, loud and clear. Let’s detach those bear hands, grab your list of keywords, and plug them straight into Keyword Explorer.

Check if you’re on the first page

Remember, you’ll need a Medium or higher Moz Pro subscription or a standalone Keyword Explorer subscription so you can create your keyword list.

Hit “Create or upload a new list” and choose “Enter Keywords” to pop those straight in there, bish-bash-bosh.

Open up a list you’ve created and pop in your URL to to see your rank from 1–10.

Check Rankings

Want to see if you’re in the top 50?

Heck yeah! Take that same list and paste them into a new campaign in Moz Pro.

If you already have a campaign running you can also transfer these straight over from Keyword Explorer. Just check the box next to the keywords you want to track, then choose a campaign from the drop down.

Add keywords to campaign

You know before (about 30 seconds ago), when we talked about manual searches returning personalized results? Checking rankings in Moz Pro avoids all that nonsense by anonymizing the data and, in my experience, provides the most accurate results, showing what the “most” users see. Pretty snazzy, right?

A new campaign will build in about 30 minutes, which is just enough time to catch up on “Stranger Things” and reminisce about Winona Ryder circa 1990…

On the other hand, adding to an existing campaign will be a bit longer. You’ll see data as soon as your campaign updates next. So you can binge watch the whole series, because why not, right?

…and we’re back! Check out where you’re ranking for your target keywords, which URL is ranking, and over time, whether you’ve moved up or down.

We also pull in search volume from Moz’s Keyword Explorer to give you an idea of demand. When looking at search volume, don’t forget that the higher the demand, the more competition you’ll likely face. Don’t be disheartened by ranking well for keywords with lower search volume, especially if they convert better.

Tracking your rankings is crucial to understanding why you’re not performing as well as you expected. If you’re seeing a lot of down arrows, you need to investigate who is jumping ahead of you and why.

Dig into keywords with falling rankings

Let’s find some keywords that have that sad little down arrow, meaning we’ve dropped down in rankings since our last update.

Here’s a little bundle of keywords that I can investigate. I’ll click on the keyword to open up the Analysis report and scroll down to “Your Performance.” Now we can see a historical graph of your rankings and track those other sites who want to push us to one side. And what do we have here?

They’ve gone and nipped in front of us! This will not stand! It’s likely that for some reason your competitors result has been getting stronger engagement for this keyword. More clicks and more people who do click staying on the page. So let’s find out what you can do to set things right.

Toolkit:

Keyword Explorer Lists – Check your rankings on the fly

Moz Pro – Track your rankings (and your competitors’) over time

Step 3: Make sure you and your content are best friends

There are 2 parts to this step, just like those ‘Best Friend’ heart necklaces that were so popular in the ’90s. Separately they look like BE FRIE and ST NDS, but together…. awww, the secret code is unlocked.

Get your basic on-page optimization in order. Check your content is tip-top quality

Don’t go changing (too often)

I don’t want to recommend you jumping in and making changes to content too often. Even Google needs time to register your updates. However, if your content is a bit dusty and you’re losing out to competitors, then it’s time to check that everything you think is in place is actually in place.

View your page like a bot

I like to think of this as a “bot’s-eye-view.” When a little bot comes along, it doesn’t go, “Oooh, look at that lovely header image! Oooh, I love that font, the white space is really working for me! Oh, how the Internet has changed since my days as a junior bot trawling through gifs of dancing babies!” It reads the code and moves on. We can do this too, with a little bit of knowhow.

Using Firefox or Chrome, you can right-click and view the page source.

If you’re unfamiliar with reading code, it’ll look pretty intimidating.

We’re going to use CMD + F (or CRTL + F for Windows) to hunt for the bits and pieces we’re after.

Pro tip: If you’re seeing og:title, this is a Facebook tag.

Likewise, if you’re using the meta property=”og:description,” this is also a Facebook tag. These help format posts when the URL is shared on Facebook. You’ll want to make sure you also have Title and Description tags link these:

<title>The best title for this page</title>

<meta name=”description” content=”The best description for this page” />

Basic page optimization

This is relatively straightforward because you control your pages. However, maybe for that very same reason, it’s still a bit of a stumbling block for beginners. I’ve been there. I once spent a whole morning trying to write a single title tag.

If you’re confused and locked in a mind-melt of madness because you can’t figure out if you should use the primary keyword and/or the secondary keyword in the title tag, chill your boots.

Here is a brisk and fairly brief run-through on how to get into a productive page optimization mindset.

Title tag basics

This is the bit you click on in the SERPs. Should be about 55 characters of punchy goodness that is relevant to your content. Because it’s relevant to your content, it includes the words you want to rank for and accurately describes what you’re talking about. You better believe Google is paying attention to click signals, so draw that click with your awesome headline. Think about the titles youclick on when you’re searching for lovely things. Do your own searches to see what title tags are out there; it’s not like they’re hard to find, they’re literally a click away.

Description tag basics

This is the bit of text under the title tag in the SERPs. They should be about 155 characters of tender lovin’ poetry that talks to the user like they’re a real human being, because they are, and so are you (unless you’re part of the cat colony I suspect controls large portions of the web). This is not a direct ranking factor, but it can heavily influence clicks. Clicks from humans. And what do clicks do? They signal to Google that you’re hot stuff!

On-page copy

Yep, you’re going to want to pop your keywords here, too. But really, let’s not get too hung up on this. If you’re writing something super-duper about your topic, this will flow naturally. Make it as long as it needs to be to make your point. Don’t rattle off the same words over and over; use language to the best of your ability to describe your topic. Remember all those clicks you worked so hard to get with your title and description tags? Well, if they all bounce back to search, you just know Google is paying attention to this. Your content has to be worth the click.

Go and look at what type of content is already ranking. This is not an exercise in scraping content, but a way to make sure that your content isn’t just as good, but much better.

This task can be done manually for a small site or for a few pages you’ve cherry-picked, no problem.

Check your whole site regularly

Maybe you’ve been creating content like a content-creating super machine and you might have skipped a few description tags. Or maybe you copy and pasted a title tag or two. In this case, you’ll want to check that it’s all hunky-dory on a larger scale and on a regular basis.

We’re going back to our Moz Pro campaign to take the heavy lifting out of this job.

Head to the Rankings tab and hit that little “Optimize” button.

Once you hit that little button, you’ve set off a chain of events where our bot looks at the keyword you’re targeting, then has a good old dig-around on your page and gives you a score out of 100.

We’re hoping for that wheel of destiny to roll around to 100.

If we make it part-way around, it’s time to look at the suggestions to see how you can improve your on-page optimization.

Focus on top-level pages, pages that convert, and high-authority pages first.

Toolkit:

Moz Pro Page Optimization – Check that your whole site is optimized correctly

Further reading:

8 Old School SEO Practices That Are No Longer Effective – Whiteboard Friday

Step 4: Become a keyword connoisseur

It’s easy to become fixated on a keyword beyond what is reasonable or healthy. Are you carrying a torch for a golden keyword? Stalking it in the SERPs even though it’s completely entranced with the likes of Wikipedia, eBay, AdWords, and Image Packs?

Ranking in the high-click zone for your keywords is all about beating other sites. This special, golden ticket to traffic wonderland might be a good long term goal, but you’re not going to get to the top of the results in the near future.

On the other hand, maybe you’re afraid of competition, so you only target keywords with very low difficulty.

This can be a winning strategy if the keywords have strong intent and you’re targeting the long tail of search, but you don’t want to put in all that work creating content and find that no one is searching for it. No searches means no traffic, and no traffic means no humans to click a thing that makes a person somewhere in the world look at their analytics data and smile.

A little bit of competition is a good thing — it indicates a healthy, profitable industry.

So we’re looking for a sweet spot: keywords with some demand and less competition. I’m going to break down what organic competition is, and how you know what level of keyword difficulty you can target.

What’s the meaning of this so-called ‘competition?’

If you want to rank organically, your competition is the other sites that are currently on the first page for the keywords. It’s not the total number of sites that are using your keywords in their content, and it’s not the AdWords competition.

If someone on your team, or an agency or a client sends you competition data that’s defined as low, medium, or high, this is very likely to be AdWords competition, and it relates to the cost-per-click.

Moz’s Keyword Difficulty score uses the top 10 organic results to calculate the Difficulty metric. It’s a score out of 100, where a higher number means that the competition is strong, and it may take you longer to see results from your efforts. Every search you bash into Keyword Explorer shows you the Difficulty score, and you can build these into lists so you can compare related keywords.

Keyword Explorer metrics

Benchmark your site’s Difficulty rating

We know that Difficulty is out of 100, but a question we get all the time is: How do I know what level of Difficulty is too high?

Well, first off, testing is a sure way to find out. But if you want a little pointer before you head down that road, here’s how you can quickly benchmark your site’s Difficulty rating.

I learnt this tip from Russ Jones at Mozcon, so I apologies for the blatant rip-off here, but it’s too handy not to share.

Time for another consoling hug from Google Search Console. Grab the keywords that are already sending you traffic from Search Traffic > Search Analytics and download them to CSV.

Save these to a list in KWE.

I usually copy those darlins out of the CSV and plonk them right into a new list.

Hit “Save,” and now you have a benchmark to use when looking at other keywords you could potentially rank for.

When you’re looking at keywords to target in the future you’ll have a good idea whether it’s a short-term or long-term goal.

You can also capitalize on keywords you’re already getting traffic for by looking for opportunities in the SERP Features. Can you steal a Featured Snippet?

I also want to track these keywords over time to see if I’m losing or gaining ground, so I’ll add them from my list straight to my Moz Pro campaign.

Next time my campaign updates, and forevermore into the future, I’ll be keeping the sharpest of eyes on these keywords.

Toolkit:

Google Search Console – Grab keywords already sending you traffic

KWE – Find the real organic competition and benchmark Difficulty

Step 5: Build your site’s authority

Now step 5 is a real doozy, and it’s a common stumbling block for new sites. Just like networking in the real world, online authority is built up over time by your connection to sites that search engines already trust.

I like to think of authority as the pixie dust from the J.M. Barrie novel Peter Pan. It’s almost mentioned as an afterthought, but without it Wendy and the gang were just kids jumping up and down on their beds. They’re thinking happy thoughts. They might even get a bit of temporary lift, you know, just like when you might get a bit of traffic here and there — enough to keep you jumping. But there’s a very big difference between jumping up and down on a spring-loaded mattress and flying off to a world of perpetual youth.

Track your authority

To figure out how much dust you have in your tank, you’ll need to take a look at the Moz metric Domain Authority. This is our best prediction of how well a site will rank for any given search. It’s on a scale of 1–100, and higher DA means more authority.

You can get your paws on DA free through Open Site Explorer or the MozBar Chrome extension. I like to keep MozBar on DA mode so I can check this metric out as I scoot about the web.

You’ll want to check your DA monthly to see how you’re progressing and save this to a sheet, as incoming fresh data will replace the current data in OSE and MozBar. Once you’ve got your data, think about plotting a tasty graph to show how you’re performing versus your competitors.

To make this a whole lot easier, head to the Moz Pro “Links” tab. Here you’ll find your historical link metrics, alongside those of your direct competitors.

Pixie dust isn’t just powering your rankings, but everyone else’s as well. These metrics are relative with respect to the other sites similar to your own, including your competitors.

Gather a pocket full of pixie dust

The first thing we always recommend when people reach out to us to find out how they can improve their Domain Authority is to improve the overall SEO of their site. The good news for you is we’ve already done that in steps 1-4 — highest of high fives to you!

The second thing you have to do is get backlinks. This is commonly known as link building. When I started doing SEO for an ecommerce site back about what feels like a thousand years ago now, I had no idea what I was doing; this term irked me, and still kind of does. It sounds like you need to build links yourself, right? Nope! It’s like you’re playing Minecraft, but instead of building the structures, you’re actually trying to encourage other people to build them for you. In fact, you’re not allowed to build anything yourself, because that’s cheating. Game changer!

Don’t forget you don’t want just anyone building these structures. You need good people who themselves have authority; otherwise, your lovely gothic mansion might turn into a pile of rubble. (This is my analogy for having spammy links that could get your site penalized by search engines.)

A lot of link building today is PR and outreach. I’m not going to go into that in this post, but I’ll include some links in the toolkit below to help you in that department.

We’re going to look at what actions you can take to track and build your authority.

Check for any leaks

There’s no point grabbing up pixie dust if you have a whopping great hole in your pocket.

Find and plug any holes quick-smart. Open Site Explorer has a handy tab just for this job. Pop in your domain and hit “Link Opportunities.”

Now here’s a list of broken pages on your site that have inbound links. Any page on your site that’s down isn’t passing on its value to the other pages on your site — not to mention it’s a shoddy user experience. Look out for any pages serving a 404 status error. I can priorities the pages with the highest DA and more linking domains.

Internal links

I said before that you can’t build any of your links yourself. However, as with everything in SEO there’s a caveat: in this case, links from within your own site are not only key to your site’s usability, but they also pass equity. Internal linking is primarily for user experience, but it also helps bots navigate your site for the purposes of lovely indexing.

Don’t stuff too many links on your page

Your homepage and other top pages will probably have the strongest authority, as other sites will link to your homepage in many cases.

You want that high-equity page to link out to other pages in a natural way that resembles a pyramid structure. Don’t forget the user in your rush to dish out equity; do visitors want to go from your homepage straight to some random deep page on your site? Does this help them on their journey?

Use the Crawl Test research tool in Moz Pro to find out if any pages of your site are flagged for having too many on-page links.

You also shouldn’t go overboard with keyword-rich anchor text. Once again, think about the user, not about gaming search engines. This one can get you penalized in some way, so keep it natural.

If in doubt, just watch Season 2 Episode 4 of the IT Crowd for this delightful moment:

If you’re scooping up big swaths of copy to get keyword-rich anchor text but it doesn’t really help the person reading the article, then maybe you’ve got yourself an awkward link at your dinner party.

To follow or nofollow?

Links come in two flavors: follow and nofollow. Generally speaking, you do want your internal links to be “follow.” Bots will follow them on the journey of your choosing and equity will be passed on, which is just what you want.

You can use the MozBar to check your pages for follow and nofollow links.

Nofollow links can be marked on a link-by-link basis, or a whole page on your site can be allocated as nofollow. Let’s find the “Meta-robots Nofollow” column in your crawl CSV and filter by TRUE to check if you intended to mark these pages as nofollow.

Convert mentions to links

If people or sites are already talking about your brand, then you’re not a million miles away from converting that to a link.

What you’re searching for are pages that mention your brand term but don’t link to you yet. This takes a bit of digging to do manually, but thankfully this is automated in your Moz Pro campaign.

Head to the “Links” tab in Moz Pro and hit “Opportunities.”

If you’re not seeing suggestions, you’ll want to modify your Brand Rules (Rankings > Add & Manage Keywords > Manage Brand Rules) and add a few more options. I already had my brand term, “fantasycostumes,” but you can probably guess this won’t be mentioned that often. So I added broader mentions like “fantasy costumes” as well as more specific mentions of my domain “fantasycotumes.com.”

Back in my campaign’s Link Opportunities tab, I can see the site that mentioned the broader term “fantasy costumes” and their authority. Now we can start to use mentions and DA to judge other sites:

Having looked at these examples, maybe they’re not talking about me exactly, but that’s ok. They’re still discussing my niche, so let’s go and see who’s linking to them by popping their URL into OSE.

This will give me an idea of what sort of content is valued and linked to, and I can use this to figure out my next step forward.

Toolkit:

MozBar – In-browser link analysis

Moz Pro Crawl Test – Find those nofollow pages and pages with too many links

OSE – Explore backlink analysis

Fresh Web Explorer – Track mentions of your brand and closely related terms

Further reading:

Moz’s guide to link building

Google’s guide to follow and nofollow links

Wrapping up

I hope this helps you begin to uncover why your content isn’t ranking for your target keywords, and sets the wheels in motion for climbing up the SERPs.

Try Moz Pro + KWE, free for 30 days

Don’t forget that Moz Pro is available free for the first 30 days and it includes Keyword Explorer, so you can start to understand your site’s authority, check your on-page optimization, track your rankings over time, and figure out how to improve them.

marketing budget tools and template

The following information and templates was originally by CoSchedule [How To Plan Your Marketing Budget With Six Free Templates]

Your marketing budget is the driving force behind your team. The money that is invested is meant to be funneled into the right projects that allow your team to create the most meaningful results for the company as a whole.

Setting budgets, however, can be a hassle. So, that’s why we built these half-dozen free marketing budget templates (and wrote up this detailed guide on how to use them).

By reading this post, you’re going to learn:

  • How to prioritize projects that will make a real difference (and get the budget for them).
  • How to understand how much budget you have available (and avoid going over).
  • How to plan budgets easily and efficiently (with six free templates).

You’ll be able to keep a clear understanding of what your team will be doing (and how much you can spend to get it done).

Download Your Free Marketing Budget Templates

The six different templates that you’ll receive when you download this bundle include:

  1. Social Media Marketing Budget Template: the social media budget template allows teams to break down their budget spend on everything from boosted posts to video production.
  2. Content Budget Template: the content marketing budget template allows teams to break down their various types of content, agency fees, and more.
  3. Advertising Budget Template: The advertising budget template is an all encompassing template that allows teams to record spend on both traditional and digital ads.
  4. Annual Marketing Budget Template: The annual marketing budget template is an all encompassing, all in one budget tracker that includes every project breakdown that is in the previous five templates.

Get Your Free Marketing Budget Template Bundle

Get Your Free Marketing Budget Template Bundle

2018Budget Template advertising Marketing       2018Budget Template Annual Marketing

2018Budget Template content Marketing       2018Budget Template social media Marketing

Why Does Your Marketing Budget Matter?

Your team is dealing with multiple projects that need to be prioritized. Having a marketing budget allows your team the clarity they need to funnel your budget into projects that will make the most meaningful impact on for your company.

There are three main reasons that your team needs to care about your marketing budget:

1. Use it or lose it. If you can’t justify the cash flow that your team needs, your organization will spend it somewhere else.

2. Prove your projects are creating growth for your company. Knowing how much you’re spending on marketing as a whole can help paint a clearer picture around how much return on investment you’re generating, too.

3. Provide reasoning for your allotted budget. When your company’s finance department turns to your marketing heads to determine how much investment you’ll be getting for the next year, having a document outlining your needs can help build a case and show where all that money is going.

How Can You Align Your Marketing Budget With Your Business Goals?

Another big step in your marketing budget is trying to invest your budget into the right projects that will create the most 10x growth for your business.

High priority projects would receive more money from your projects than projects that don’t contribute that same amount of growth.

For example, say that one of your overarching business goals for the year was to increase the amount of traffic that is going to your website. It would make more sense to funnel more money from your budget into projects that contribute to that goal than say events.

To do this, first, work with your team to come up with a list of overarching marketing goals that are going to contribute to your bottom line.

Then decide as a team which marketing projects will contribute the most growth to those goals.

Those top projects will be where you contribute a majority of your budget.

How To Not Go Over Budget

So you have your projects set, your budget is approved, and you’ve started investing your allotted money.

But then you start to realize that one of your projects is about to go over budget.

Yikes, right?

There are ways that you can avoid all of that.

Accurately Estimate How Much Your Project Is Going To Cost

The biggest step your team can take to avoid going over budget is to accurately estimate how much your top projects are going to cost to complete. There are two ways that you can do this:

  1. If the project is a repeat of last year, look at how much your team spent to finish the project. Base this year’s estimate off of what you spent last year.
  2. If the project is new, calculate every small step of the project that needs to be completed and how much it will cost to complete those steps. Use those step costs to formulate an overall project cost.

Keep Track Of Where Your Money Is Going At All Times

If your team decides to spend 15 dollars on a Facebook ad, record it right away. It could be in your template, or in a separate document, but do not let those small purchases sit unnoticed.

So let’s say that you’re working with your social team and they get a series of receipts from boosted posts on Facebook that total up to 256 dollars.

In your social media marketing budget template, scroll down to the section labeled boosted posts:

Update the budget template with the money your team has spent:

Keep repeating the process as often as your team needs to keep the budget up to date.

How To Use The Templates You Downloaded

Remember those templates that you downloaded earlier? They’re pretty awesome, right?

But there’s also a lot going on with them. Let’s walk through how to use them quickly.

Monthly, Quarterly, and Yearly Breakdown

In your template, you’ll see that your budget is broken down into three pieces:

  • Monthly spend
  • Quarterly spend
  • Yearly spend

You can see monthly spend on each of your projects by scrolling down the vertical monthly column. You can also see what percent of your budget you have spent in that month as well.

Your quarterly project spend is broken down horizontally across your screen:

To see the total that you’ve spent for the month and the quarter, scroll down to the bottom of your template:

You can also see a monthly breakdown in the chart below each quarter. These will automatically populate for you:

Wistia video thumbnail - marketing-budget-template-quarter-chart-example

Your yearly breakdown can be found by scrolling to the left to the last column in your template. The pie graph at the end of your spreadsheet will also automatically update as the numbers change in your template.

Wistia video thumbnail - marketing-budget-template-total-spend-video

Entering Data

Bolded Numbers mean that there is a formula attached to them. These are total project costs and will usually feed the graphs and total budget numbers throughout your template.

Numbers in plain text are usually contributing to the bolded numbers above it. These are breakdowns of what amount of money is being spent on a project.

Whatever you do, do not type over the bolded numbers that have contributing pieces to the overall total. This action will break the formula.

“Okay, but what if I do break the formula?”

Hitting the back button won’t always work, so here’s the quick fix:

  1. Select the box that used to contain the function
  2. Type =sum in the box
  3. Select Sum from the popup menu
  4. Highlight the columns or sections you want to be totaled in the box
  5. Hit enter
Wistia video thumbnail - marketing-budget-template-fixing-functions

This process applies to every function that is part of the spreadsheet. To see if a box has a function attached to it and which boxes are contributing to the total check out the following video:

Wistia video thumbnail - marketing-budget-template-finding-functions

What To Do If You Need To Add More Rows To Your Spreadsheet

So let’s say that you have a project that needs more rows added to the category. For this example let’s say that you wanted to add Snapchat into your social media column:

Wistia video thumbnail - marketing-budget-template-adding-additional-rows

How To Edit Your Bar And Pie Graphs

The last part of today’s instructions are going to show you how to edit your bar and pie graphs in case something breaks:

Wistia video thumbnail - marketing-budget-template-editing-graphs

Once you get going, the templates fall into place easily.

Select Your Templates

For this post, there are six different budget templates that different sections of your marketing team can utilize.

Social Media Marketing Budget Template

The social media marketing budget template is a place for your team to record different expenses that social media can accumulate including content development, graphics, and videos as well as boosted posts and ads:

Content Marketing Budget Template

The content marketing template is a place to record any expenses that come along with creating original content for your company including different content creation costs, freelance costs and even space for agency and tool costs:

PR Marketing Budget Template

PR professionals are going to love the PR template because it records all those smaller detail pieces that go into public relations including but not limited to content production, sponsorships and a detailed space for recording event planning costs:

Advertising Marketing Budget Template

Advertising can make up a huge part of marketing budgets and can easily get out of control if not tracked correctly. This template contains sections to record your budget spend in areas like digital, social and traditional advertising:

Event Planning Marketing Budget Template

This next template is every event planner’s dream. Packaged all in one place, event planners can keep track of venue, catering, decorations and other miscellaneous fees:

Annual Marketing Budget Template

This last template is an all encompassing budget tracker that will allow your marketing team heads, higher ups and clients see exactly where you’re spending your money. This template includes budget tracking for all of the projects that were included in the previous five templates:

Keep Your Spending On Track With Your New Budget Templates

Now you have the knowledge and skills to organize your marketing budget. By having the right information and the right plan you can funnel money into the projects that are going to grow your efforts by 10x.

Get Your Free Marketing Budget Template Bundle

2018Budget Template advertising Marketing       2018Budget Template Annual Marketing

2018Budget Template content Marketing       2018Budget Template social media Marketing

MailChimp Tutorial for Automation1

Email marketing is overrated for businesses, right? Wrong!

Years ago, digital marketers began moving away from email marketing as social media began gaining steam. We told our clients that social media was how we should connect and build a tribe and that open rates on emails were decreasing. We pulled out stats that showed how much more likely someone was to buy from a business if they were connected through social media. And yes, this is still the case that consumers are more likely to buy from a business they follow on social media, but the problem now is that businesses need to pay to have their message shown to their followers. Taking Facebook as the forefront of this movement, a business may only reach 3-5% of their Likes on any given post if they decide not to boost it.

Because of this, email has risen again to the best way to monetize your digital marketing. When an individual gives you their permission to correspond via email, don’t hesitate to send them an email! They have agreed that you are providing them information they need to be more educated or better a specific aspect of their life of business.

Email marketing allows you to:

  • Stay connected with your tribe
  • Reach customers in real-time
  • Measure real return and results
  • Provide targeted messaging to specific groups of people
  • Build brand awareness
  • Educate and sell your services and products
  • Automate your communication with your tribe

In this blog post, I’ll be taking a deep dive into MailChimp, specifically the resources available within the Free account, that you can implement immediately in your business to monetize your digital marketing efforts.

Why MailChimp?

MailChimp, just like Constant Contact, My Emma, Convertkit, SalesForce, Zoho, and all the other email marketing providers out there is intuitive, easy to customize, and provides the ability to:

  • Segment lists
  • Personalize to/from fields and the email content
  • Match your brand colors
  • Measure ROI

The main benefit of MailChimp, especially as you are just starting to build your email list, is that the Free account offers marketing automation through workflows. MailChimp is no longer just for sending email blasts, but now you can send tailored messages to an individual that directly relate to the information requested or downloaded from your website. Automation through creating workflows is the secret sauce to saving time and energy as you monetize your marketing.

Let’s get started – a MailChimp Glossary

Assuming you have already created your MailChimp account, you will see across the top navigation, four options: Campaigns, Templates, Lists, and Reports. Let’s take a quick look at these one by one for context before we jump into the tutorial for setting up your automation sequence.

Campaigns: This is where you Draft and Published emails and workflows exist. The Campaigns tab is where you will design and send your emails.

Templates: Templates are where the layouts of your emails are stored. When you create a campaign, you can save the email design as a template or use a preexisting template from MailChimp.

Lists: Lists are what MailChimp calls the place where you collect your subscribers. You can have numerous lists and within each list you can create different segments to ensure the right message goes to the right person every time.

Reports: After you click send on a campaign, MailChimp starts collecting stats. Here you can see open and click rates, unsubscribes, and other valuable data for your business.

Getting Started with MailChimp Automation

Now let’s go through the process together of setting up your complete automation sequence. Below I will take you step by step through:

  1. Setting up your List
  2. Creating and embedding a form into your website
  3. Customizing your Welcome Email for new subscribers
  4. Creating an automated sequence of emails to help introduce yourself and services and to convert new subscribers into paying customers

Step 1: Setting up an Email List of Subscribers in MailChimp

As mentioned above, lists are where your email subscribers are housed. You may decide to have a list for your clients and one for website leads or you may have multiple lists for conferences you attend and folks interested in very specific segments of your business. To start, we are making one list that is specifically for individuals who download a lead magnet or content upgrade from your website.

Click Lists from the top navigation then Create List.

MailChimp Automation Tutorial

From here, if you are just getting started, you will want to Create a New List. There is also the option to create Groups within an Existing List, which is how we will segment leads for specific content downloads where you will want messaging targeting their interests being sent their way. Groups allow basically create sublists with overlapping subscribers.

For now, just click to Create a List.

MailChimp Automation Tutorial

Here enter in your:

  • List name (Website Subscribers)
  • Your Default From Email Address (Where you want replies going)
  • Default From Name (Include your actual name here and if needed your business name, too)
  • And remind people how they signed up for your list (each list will most likely have a different reason why the
  • individuals are on the list).

Additionally, you will see your contact information. A physical address or PO Box is required by law to meet the Anti-spam requirements of the US CAN-SPAM Act. If you work from home, I recommend as you implement email marketing into your business, setting up a PO Box. Unless your list is only made from family members, you don’t want everyone knowing where you live!

Click Save to continue.

Step 2: Create a signup form.

Now that the list for website subscribers is completed, you can go ahead and create a Signup form to embed on your website.

MailChimp Automation Tutorial

First we will want to customize the form fields and options. Afterwards, we can embed a form into your website.
Click Select next to General Forms.

MailChimp Automation Tutorial

On the next page, we are going to edit the fields for the contact form. Here you can add fields, or hide fields. The default is Email, First Name, Last Name.

I recommend reordering the fields and removing last name. For forms like a content upgrade asking for just a bit of information is great. You don’t need to inundate the new subscriber by asking them everything about themselves!

MailChimp Automation Tutorial

The next tab, the Design It tab, allows you to customize your colors to match your brand standards. Click through the different options here to customize each element. As you work through the Signup form settings, the customizations will automatically save to your account.

Once your form is customized, it is time to customize the response emails.

Step 3: Your Confirmation and Welcome Emails

Now, the flow for MailChimp, and this is fairly common for all email sequences, is that once an individual fills out their information, they need to confirm their email address in order to be added to the email list or to gain access to a resource. The email confirmation and welcome email are all customizable within the General Form Settings.

Let’s go step by step through these options.

First, select Signup thank you page from the Forms and response emails dropdown.

MailChimp Automation Tutorial

Here, we will customize the form someone sees directly after they enter their name and email in the form. We will want to change a few elements on this page. Conversely, you could also create a thank you page directly on your website. At this point I do NOT recommend providing the lead magnet link. Within MailChimp, you need to first have the subscriber confirm their email address and then you can continue marketing to them in the future. If they don’t confirm their email, you won’t be able to send follow up emails.

On the Build It tab of the Sign Up Thank you page, use the Drag and Drop editor to add a branded image as the header of the page. Hover over the form title and click Use Image to upload and select a header image to use.

MailChimp Automation Tutorial

I also recommend editing the text on the page to be more specific about your Lead Magnet information.

MailChimp Tutorial for Automation | Email Marketing Automation | How to set up a welcome series in MailChimp | MailChimp forms and Lead Magnets | MailChimp Tutorial

At this time you can also change the colors to match your brand standards.

Please note, the header image and some design elements carry throughout the entire customization process. For example, if you load the header image in the form settings rather than the thank you page, the header image should automatically load in other settings.

The next element of the sign-up sequence is the Opt-in confirmation email.

Select Opt-in confirmation email from the Forms and response emails dropdown.

MailChimp Automation Tutorial

From here you will see the standard text for the opt-in email.

All of these elements within the email, as well as your Subject line can and should be updated.

  • Subject line – The Default is: *|LIST:NAME|*: Please Confirm Subscription. Please change this . Something along the lines of Claim your Free Resource or in my example, Confirm your Email to Receive Free Download
  • Within the body of the email be sure to reference your Lead Magnet.
  • To adjust the “Yes, Subscribe Me To This List button text, select Translate It.

MailChimp Automation Tutorial

Click Save Translation Settings to save your new button text.

Hint: all button text is in the “Translate It” settings

MailChimp Tutorial for Automation | Email Marketing Automation | How to set up a welcome series in MailChimp | MailChimp forms and Lead Magnets | MailChimp Tutorial

The next part of the MailChimp sequence is the Confirmation Thank you page. Select this from the Forms and response emails dropdown.

As the subscriber has confirmed their email address, it is now alright to share your lead magnet with them. I recommend at this point, adding the resource as a PDF onto your website. If you use WordPress, Click Media > Add new and upload the PDF. To actually design this content upgrade, you can use powerpoint, word, Canva, or really any other tool that you feel comfortable with. What you will need to do once you load the PDF to WordPress is copy the URL of the resource.

Copy this URL and then Paste it back in MailChimp in the setting for “Instead of showing this thank you page, send subscribers to another URL,” then Click Save.

MailChimp Automation Tutorial

The last step in the Mailchimp sequence is to create the Final Welcome Email.

Select Final Welcome Email from the Forms and response emails dropdown.

The Most Important element on this page is to select the checkbox for Send a final welcome email.
Items to update in the Final welcome email:

  • Select the checkbox for Send a final welcome email
  • Edit the subject line (default is: *|LIST:NAME|*: Subscription Confirmed)
  • Edit body of email to include the link to the Lead Magnet PDF.

MailChimp Tutorial for Automation | Email Marketing Automation | How to set up a welcome series in MailChimp | MailChimp forms and Lead Magnets | MailChimp Tutorial

PHEW! That was a lot of steps! But now you are all set to embed the form on your website!

Step 3: Embedding your Form on your website.

Now we’ll grab the code we need to embed the form into your website. Click the link for signup forms again and this time, select Embedded forms.

MailChimp Automation Tutorial

Here you can customize the Form which will be embedded on your website. Within the Embedded forms, you can choose from a variety of layouts. I recommend collecting BOTH the name and email address of your subscribers as personalized emails not only have a higher open rate, but also a higher conversion rate. Sure you could argue that there may be fewer signups, but I would take a more engaged audience any day. Due to this, I recommend utilizing the Classic Form rather than the Super Slim or Horizontal layouts.

Here, Edit the Form Title so it clearly identifies what will be downloaded or what action will be taken once someone provides their information. The example below has “Download your Ultimate Guide to Email Sequences” as the title.

MailChimp Automation Tutorial

At the bottom right of the page you will see the embed code. This is the actual code that you can then copy and paste onto a page of your site! Mailchimp does have a plugin that you can use to easily embed forms using shortcodes on your site, but below I walk through embedding this form on a webpage using the full code provided.

When you are editing a page on WordPress, click the “Text” view to insert html.

Scroll to where in the content you would like your form to exist and paste the code that you copied from MailChimp. Once you click Publish, your page and form will be good to start collecting leads!

MailChimp Automation Tutorial

And the published page!

MailChimp Automation Tutorial

What next, you ask? Creating the automated email chain!

The automated email sequence in MailChimp or a workflow is the perfect way to introduce yourself, your brand, a course or promotion, and educate your new subscribers before you add them to your newsletter or broadcast campaign.

You may be asking why you need to now add the subscriber to an automated email workflow after sending them multiple emails to confirm their email address and then send them an offer. Think about the first time you meet someone and learn from their business or the first time you sit down with a coach, counselor, or educator. You want to understand who they are and why you should trust them.

Creating a relationship online should follow that same process – you need to earn the trust of your contacts. The average consumer requires 7-14 touches before they are open to making a buying decision. Social media and writing meaningful blog posts is one way to continue building a relationship with your tribe, but emails are another way. By adding someone directly to an email sequence in MailChimp, you are putting your best foot forward in the process of converting a free download into a paying customer. These initial emails should look just like the initial conversations you have with prospects. You need to introduce yourself, educate, explain your services, educate some more, and close the deal.

A complete guide on structuring your Welcome email sequence along with prompts to write your own emails are available for download below!

Ultimate Welcome Series Checklist [FREE]

We won't send you spam. Unsubscribe at any time. Powered by ConvertKit
Are you ready to make a lasting impression? Let’s jump in.

Step 4: Creating an Automated Email Campaign.

At this point we already have our List created and our opt-in and welcome email structured. Now it is time to create the MailChimp Automation Campaign. Just like other campaigns in MailChimp, automation campaigns live in the Campaigns tab of your account.

In the upper navigation, click Campaigns > Create Campaign > Create an Email.

From here, select Automated and in this case we will want to select the Welcome New Subscribers option.

MailChimp Automation Tutorial

Within the Welcome new Subscribers automation within MailChimp, there are currently 3 selections: Welcome message, Onboarding services, and Educational series. Honestly, each of them works the exact same, they just are preloaded with different sample emails.

MailChimp Automation Tutorial

In this tutorial, just select the Welcome message option, name your Campaign, and select the list you just created. As you will see in the next few steps, each of the campaigns are customizable to act however you wish and to include however many emails you want to build!

I’ve found that having a blank template at times is easier to set up instead of editing the information that already exists.

After you Click Begin, you can start your customization of the MailChimp Workflow.

Step 5: Customize your Welcome Email within the Automation workflow.

We are almost there! Kudos for following along.

MailChimp Automation Tutorial

The first step is to click Design Email on the first email that has been already created in the flow. Once you click Design email, you can edit the name of the email, your subject, the preview text, and your from name and email.

Tip: Email subjects are the key to getting folks to read your email. Don’t be afraid to jump in and test a new subject line if you think something may lead to more opens. Most important, however, is to be descriptive. People don’t like feeling as though they’ve been tricked into reading something. Questions also work well, as do tips, tutorials, personal stories, etc.

Once you’ve filled out this information, click next and select your Template. MailChimp has a lot of wonderful templates that are drag and drop, or you can make your own. I recommend using a simple template for all of your email marketing. This makes the branding very straight forward and aides in brand recognition. If you already have a campaign created for a newsletter broadcast, you can jump back over to that campaign and click to save the email as a template.

Because it is a simple layout, this time I selected the “Follow Up” layout.

MailChimp Automation Tutorial

From here you can design your email!

Now remember, just like when you are first meeting with someone, you want to know a bit about their background and story. This is the perfect place to add that information. MailChimp’s intuitive drag and drop email builder makes it fairly straightforward to add content and images.

As you can see below, I’ve added a logo, deleted the image block from the template, and updated content. Once this is complete, you can click “Save and Return to Workflow.”

MailChimp Tutorial for Automation | Email Marketing Automation | How to set up a welcome series in MailChimp | MailChimp forms and Lead Magnets | MailChimp Tutorial

Step 6: Building Out Additional Emails and Workflow Settings!

Once you’ve completed your first email in the MailChimp Automated campaign, I recommend adding a handful more to ensure you are providing the absolute best content right when you are starting a relationship with the new subscriber.

So I’ll leave you to creating those emails. Again, you want to be as educational as possible, but to really start seeing sales quickly, there need to be some prompts to either learn more about your services or products. The complete guide to creating your emails and monetizing your site is available for download below.


Ultimate Welcome Series Checklist [FREE]

We won't send you spam. Unsubscribe at any time. Powered by ConvertKit


As for the additional settings within your workflow, we have the Trigger, Schedule, Segment, and Action.

MailChimp Automation Tutorial

Trigger: In this case, you’ll want to adjust the trigger for your additional emails. It is okay if you would like to send an email out every day, but this may be a little overwhelming for a new subscriber. I recommend setting the Trigger to 2-3 days for your follow up messages.

Schedule: This great feature allows you to specify which days of the week and time ranges you would like to send your follow up messages. Perhaps you always want to refrain from sending emails on Sundays, or between the hours of 11pm-5am, you can adjust that here. Take a look at reports from your industry about the best days and times to send emails – you may find some results surprising!

Segment: If you’ve created segments within your list, here is where you can specify what segment the email should be sent to. This feature is helpful for future offers once you’ve learned more about your audience. Maybe some people are just getting started whereas others are experts in your field. It works well to send a different message to each group.

Action: You can also specify something to happen after an email or email chain is sent to an individual. More advanced features here are available in the paid accounts.

And with that… You know can create a list in MailChimp, structure and optimize a form, as well as the opt-in and welcome emails, embed the form on your website and create your Welcome Series automation email chain in your Free MailChimp account! In the comments section, please share your link for your forms and Lead Magnet so we can take a look!


Best of luck!

MailChimp Tutorial for Automation, Email Marketing Automation, How to set up a welcome series in MailChimp, MailChimp forms and Lead Magnets, #MailChimp Tutorial #emailmarketing

MailChimp Tutorial for Automation, Email Marketing Automation, How to set up a welcome series in MailChimp, MailChimp forms and Lead Magnets, #MailChimp Tutorial #emailmarketing

Not too long ago, people would visit the local stores and endure the long lines just to get the things they need. Today, however, people prefer to shop online. In fact, studies revealed that consumers make 51% of their purchases online.

With the growth on online retail and shopping, many of you probably have an existing e-commerce business or looking to start an online business.

Here are some tips for creating a successful online business.

Bring your products to life

Product photography can mean the difference between losing customers and making a sale. High quality product photos are a must when trying to persuade people to buy your stuff.

Internet users are bombarded with ads, emails and news stories. With so many businesses vying for their attention, you only have a few seconds to capture the attention of your target audience. Unique and visually appealing photos can help you do just that. If you’re selling clothes, we recommend that you hire a model. This way, people will have an idea how the clothes look like when worn.

Clean and user-friendly design

A professionally-designed and user-friendly website can go a long way in the success of your online business. It also adds credibility and will help increase trust in your company.

According to studies, 42% of online shoppers base their opinion of a business based on the overall design of their website. Majority of consumers didn’t push through with the sale because the site has poor aesthetics.

Fast loading time

An average person has an attention span of 8 seconds. Yes, you read that right. They want to get things they want fast. This is why we’re in the age of fast – fast cars, fast foods and fast websites.

Survey revealed that people expect websites to load in 2 seconds. They would leave the site if it doesn’t load within 4 seconds. Slow loading time can drastically affect your sales. People aren’t going to stick around if it takes a while for your website to load.

Easy payment process

Most people prefer to shop online because it’s more convenient. As such, you want   to make the shopping process easier for them. The more methods of payment you offer, the more likely a customer will buy.

Credit cards and Paypal are the quickest and easiest ways for customers to pay. You may also offer cash on delivery, money order, personal cheque, direct deposit into your bank account.

Tips for creating a successful online business | How to create an online business | Internet business | Ecommerce business | Online business | How to create an ecommerce business | building a business online | successful business | ecommerce how to

Nothing is more frustrating than spending time, money and effort only to find out that you’re not getting the results you want. You sent out emails, printed flyers and blasted your social media followers. Despite the effort and hard work, you’re still not getting the leads you need to grow your company.

If you’re having trouble generating qualified leads, you are not alone. There are several reasons why you’re not getting the leads you deserve. Here are some of them.

You’re targeting the wrong audience

When working on your marketing campaign, the first and most important things you need to do is to identify your target audience. This is a critical step that shouldn’t be skipped. If you don’t know who your target audience is, how could you possibly attract one?

Learn as much as you can about your target audience – demographic, interest, buying habits etc. If you fail to identify accurate buyer personas, you may end up reaching too broad of an audience or marketing to the wrong customers.

Your content sounds like a sales pitch

Creating new content is a great way to capture the attention of your audience and generate leads. But if your content sounds like a sales pitch, then people are not going to notice them. With the amount of advertisements we see every day, people learn to ignore them and focus on things they need instead.

If you want to capture the attention of your target audience, you need to come up with unique, interesting and informative content. Share your knowledge with them. Write blogs on a regular basis and make sure they are share-worthy. Eventually, people will see you as an expert and convert into a loyal reader or a customer.

You didn’t provide a call to action

A lot of marketers and business owners will take the necessary steps to acquire qualified leads. Your customers are actually where you want them to be. The problem is that you failed to provide a clear call to action.

People don’t know what exactly it is you want them to do unless you tell them. Keep your call to action simple – subscribe to our newsletter, get a quote now, contact us today.

You’re not active on social media

We know how powerful social media is. It allows you to interact and build a relationship with your target audience. If you are looking to drive traffic to your website, we highly recommend that you share your content on social media. With just a few minutes, you’ll be able to reach thousands and thousands of people. Not everyone who visits your site will turn into a paying customer, but you need traffic to get qualified leads.
How your business can generate leads | Business leads online | Email incentives | Email opt-ins | Content upgrades

How your business can generate leads | Business leads online | Email incentives | Email opt-ins | Content upgrades


Running a business in the digital age has its perks. It also can be incredibly difficult. Retail stores need to rethink their sales channels and social media networks get you sucked into a deep abyss if you aren’t careful. Over and over again, however, we see business owners make the same mistake. It is based off a misconception that can not only hurt the long term success of your business, but can also keep you from ever getting off the ground in the first place.

The most common misconception about digital marketing is that digital marketing replaces the need to make personal relationships.

When we first create social media accounts for clients, we have to consistently change our client’s mindset about what their networks will do for them. Our clients want to see their networks boom, which can be a great goal, but to what end? Would you rather have a small network of devoted customers who trust you and help sell for you or a large network of individuals who don’t even recognize your name, let alone buy from you?

Many times the client who wants and expects the large network then stops their in person networking and relationship building thinking that one post per day is actually going to lead to new sales. Though, again, if your network is active and trusts you, this may do the trick, but for businesses, you can and should never stop your personal relationship building.

The digital age has made many business owners lazy when it comes to getting their word out. They sit online wondering why nobody has come knocking on their door. Those who hustle, however, reap the benefits.

You now have access to millions of people, if you only reach out. My recommendation for clients is to find the individuals who are are your level or a step above you that you admire and wish to connect with. Start following their social media accounts and commenting on their posts. As you do this, share their posts, too, and tag them so they can a notification that you are publishing their content.

From here… reach out! Write an email or direct message the individual. Let them know how much you’ve enjoyed their articles on X, Y, Z and then get straight to the point. What are your goals for reaching out for them? Do you want to run a joint webinar? Do you have an article that you think their audience would enjoy or benefit from?

The more clear you are, the more likely you will receive a reply. Of course, leading up to this point you’ve been interacting with them on their social media and blogs, so you should already have some name recognition.

In addition to digital networking, keep up your local networking.

Meeting with people and groups keeps us on our toes and from moving away from what the market needs. It helps us refine our message and get real time feedback from individuals we know and trust. This blog post  goes into more detail about why networking groups can transform your business and how to get involved.

To make sure that you aren’t making the biggest mistake in the digital age, continually get out of your comfort zone and form actual relationships with people you admire who are one step ahead of you. Even if the relationships start online, you are still treating the account handle or email as a person, and that individual respond accordingly.

Do you still network in person? Have you succeeded at reaching out to an individual you now partner with online?

Be sure to share your success stories!

The Most Common Misconception About Digital Marketing. Running a business in the digital age has its perks. It also can be incredibly difficult. Retail stores need to rethink their sales channels and social media networks get you sucked into a deep abyss if you aren't careful. Over and over again, however, we see business owners make the same mistake. It is based off a misconception that can not only hurt the long term success of your business, but can also keep you from ever getting off the ground in the first place.