How to Create a Strong Video Marketing Strategy

I’m sure you have heard the craze around video marketing, right?

It’s 2021 people! At this point in the digital marketing game, you HAVE to implement video marketing! And I am not talking about the cheesy videos, or you hiding behind a presentation and just having your voice being heard. I am talking about getting your face in front of the camera and really connecting with your audience.

One of the biggest trends in the social media marketing world is building an authentic brand, allowing your patients to see behind the scenes, and really know, like, and trust you.

Video marketing allows you to build patient loyalty and keeps you top of mind, by using video your fans can share your videos and are more likely to refer you to family and friends because they have a deeper connection with you and your office.

Why is Video Marketing SO Important?

I totally get the fear of video marketing, we have been in business for over 10 years, and it wasn’t until March of 2018 that we started implementing videos into our own plan.

It was something we ALWAYS recommended our clients did, but not something we DID for our own business! Funny how that works, huh?

You don’t need to have a studio, expensive equipment, or celebrities, you would be amazed at what you can do with the technology you probably already have, like iPhone, or smartphones, a digital HD camera, etc.

This rock can hold people up and get in their heads, it then becomes an excuse, I don’t have a fancy studio, backdrops, big lights, huge camera, etc. therefore I can’t produce a good video.

We will discuss this process below.

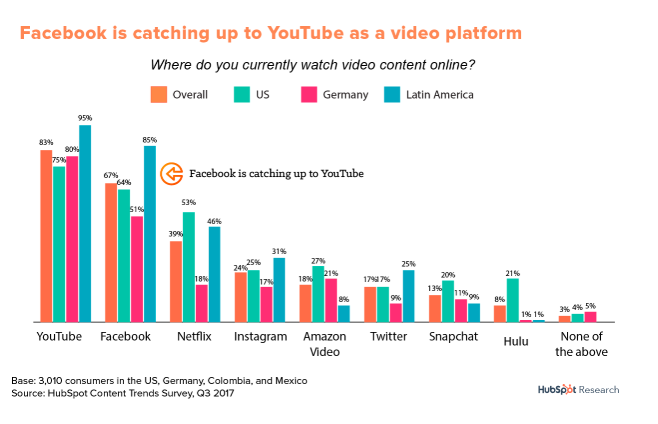
Before we jump into the 5 steps for a video marketing strategy, I wanted to give you a few stats from our friends over at HubSpot.

In their words – “Video has absolutely dominated social. According to a recent HubSpot Research report, four of the top six channels on which global consumers watch video are social channels. In addition, a Facebook executive recently predicted that the platform will be all video in less than five years.”

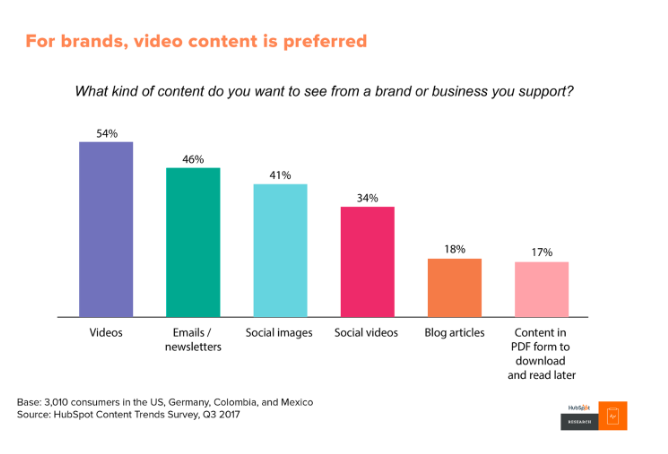
“According to a report from HubSpot Research, more than 50% of consumers want to see videos from brands … more than any other type of content.”

Video is useful for more than entertainment, too. Video on landing pages is capable of increasing conversion rates by 80%, and the mere mention of the word “video” in your email subject line increases open rates by 19%. 90% of customers also say videos help them make buying decisions.

So, let’s dive into the top 5 steps to have a clear video marketing strategy.

Step 1Find your Target Audience

A great place to start with this task is your current patient list, who are you currently serving?

A few questions to ask yourself:

  • Who is my ideal patient?
  • What are they visiting my office for?
  • What problem or pain points do I help them with?
  • Where are they located?
  • What is their lifestyle like?
  • What can you offer them for free to help with a pain point?

Having a clear understanding of WHO your target market is and WHY you want to work with them is key!

Look at your current patient list and think of all your favorite patients, why are they your favorite, what do you like most about them, and what is their living situation like?

You want to attract the right patients into your clinic, right?

Patients who:

  • Value your services and team
  • Pay you on time or have good health insurance to cover the bill
  • Respect your time
  • Loyalty – Patients that are going to stick with you and brag about you to everyone they know!

Step 2Have a plan

Imagine that! In order to have your video marketing working FOR YOU, you need to write out a clear plan. Now that you understand who your target market is, it’s important to create the videos that are going to connect with them.

There are many different types of videos you can produce:

  • Brand videos
  • Events
  • Interviews with patients or colleagues
  • How To’s
  • Animation videos
  • Case Studies
  • Testimonials
  • Facebook or Instagram LIVE
  • Personalized messages
  • Promotional or exclusive offers
  • Product launch
  • Behind the scenes
  • Tips & Tricks
  • National Observance Days 

The best way to organize your video marketing strategy is to implement it into the content calendar we have shared before LINK HERE I would create a new tab for your video marketing, then on the main calendar tab 1, you want to be sure you know when you are sharing those videos and to what platforms.

Step 3 – Figuring out the tactics and techy stuff

Once you lay out your video marketing topics, then you want to figure out what videos should go on what social media platforms.

As I said in the beginning, you don’t need fancy equipment or a fancy studio in order to produce a good video. These videos are more about building long-lasting relationships with your patients. Building brand loyalty.

We are not talking about a commercial we are talking about 1-3 minute videos. Some of your videos if you are showing a “How To” or interview, those may be longer. Just keep in mind your goal for each video.

What is that videos purpose?

A few things to think of before you hit record are:

  • Do you need to write out a script or have bullet points? I like to write down the bullet points for each video and what the length should be. When I put a script in front of me I get really nervous, I like to wing it in a way! But. you have to find the best process for you.
  • Picking the right place – setting the stage. You don’t need to have a fancy studio, but if you pick a spot in your home or office that has good natural light, good sound, that will make a difference. Thinking of doing videos during the day with the natural light, rather than in the evening when it can be darker inside.
  • Recording Process – How are you going to record the video? Here are a few options
    • Mac – Quicktime player
    • Zoom – Screen share option
    • iPhone or smartphone
    • Computer Camera (Make sure quality is good)
    • HD camera
    • Microphone – you can use your headset or external mic if needed
  • Editing
  • Publishing

It may seem like a lot, but see where your team/staff can come in handy and where you may need to outsource a few things.

Be sure to time block for the recording process and the wrap-up (Editing, publishing, thumbnail, etc.)

Step 4: Uploading Your Video

Now, that you have the video recorded and ready to show the world, there are a few steps you will need to take to upload your video correctly.

When you are creating a video it may have a certain purpose, most videos should go onto YouTube regardless, but you may make one specifically for Facebook or Instagram. If that is the case you can upload them directly to those platforms.

YouTube is owned by Google and the 2nd highest trafficked website, they have over a billion users and people are recorded to watch more than 500 million hours of video daily! This number is growing each and every day. So, yeah your videos should always be uploaded to YouTube in addition to social media platforms!

To upload to YouTube:

  • You will want to make sure you have a YouTube channel set up.
  • Then you can click upload video
  • Find the video on your computer
  • Have a good SEO friendly title
  • Write a description with call-to-action and link to your website
  • Create a playlist to keep videos organized
  • Add tags – keep them SEO friendly
  • Then upload a Thumbnail image (Create in Canva)
  • Once a video is uploaded to YouTube it gives you a link where you can share to Facebook, LinkedIn, Twitter, and Pinterest, it also gives you an HTML code that is how you can put that video onto your website or into a blog.

*** BONUS – Download TubeBuddy TubeBuddy is a browser extension which adds a layer of amazing functionality right on top of YouTube’s website. They help with finding the right tag words and making your video as searchable as possible!

The other thing to think of if you are planning on doing a lot of videos . . . which you will be is where do you want to store your videos? They end up taking up a lot of space on your computer. Look into Vimeo, Dropbox, Zoom, iCloud, etc.

Step 5: Track your results and analyze

One thing I love about doing videos is being able to monitor the results, the views, the comments, the shares, etc. It makes me feel like people are really interested in what I have to say HA!

Just because you do one video doesn’t mean you will get a million views, some of the videos we have done haven’t gotten any views.

It’s important to track these results and find out why, was it a poor title or description, are people not really searching for that?

Remember each video should be addressing your target market and sometimes your messaging needs to be fine-tuned. This is why the planning piece is so crucial because you want to hit the pain points your audience is searching for.

Ways to monitor ROI from video marketing:

  • Google Analytics
  • Your YouTube channel stats – check views on each video, comments, likes, etc.
  • Total views
  • Clickthrough rate, this would be for email sign-up or on social media
  • A conversation started through landing pages or on website
  • Social Media
    • Likes
    • Comments
    • Shares and retweets

I would look at your video marketing each month, at the end of each month analyze each video and collect your data. Make notes of what videos got the most ROI and see how you can create more videos around that topic, then the videos that didn’t do as well, look at the title and description, can it be edited or does the video need to be redone?

What happens if you have high views but little or no engagement? Maybe you do not have a clear call-to-action in the video, ask a question at the end to start the conversations.

Pay attention to the numbers and the platforms you are getting the most engagement.

In conclusion, as you can see it is important to have a plan and logic behind your videos, to make sure each video you make is serving a purpose. I wanted to end this blog with some free tools that can further assist with your video marketing strategy, a few of them I have already mentioned in the blog.

Free Tools to Use for youTube:

  1. BuzzSumo – Analyze what content performs best for any topic or competitor. Find the key influencers to promote your content.
  2. Canva – Allows you to create the correct size Thumbnails for your videos
  3. TubeBuddy – Free browser extension that integrates directly into YouTube to help you run your channel with ease.
  4. Scheduling Tools like CoSchedule, Buffer, or Hootsuite 

I would love to hear your success stories with how video marketing has been a successful marketing tool to grow your business.


How to Create a Strong Video Marketing Strategy

How to Create a Strong Video Marketing Strategy for Your Nutrition PracticeHow to Create a Strong Video Marketing Strategy for Your Yoga Practice

How to Create a Strong Video Marketing Strategy for Your Acupuncture

how to write high quality blog posts quickly

In 2018 we published a blog on how to easily write a blog post for your business. This is a supplemental video to that blog with updates for blogging in 2021!

Namely, don’t hesitate to write shorter blogs if they fully answer the question at hand.

With the rise in mobile searches and voice searches, Google has prioritized some answers that get straight to the point rather than blogs that include the answer within a long drawn-out piece of content.

You’ve been told that you need to write blogs for your business, you now understand these blogs need to be >2,500 words, but how do you find the time in your schedule to actually write a good blog post?

Everything in marketing always comes back to finding systems that will work for your schedule to write an educational and informative blog post quickly.

In this post I’ll be going through my top tips for writing a good blog post quickly.

If you are just tuning in, over the past few weeks we’ve been talking about how to perform keyword research and find related keywords to include in your blogs:

Ok, so let’s jump in an get started.

First and foremost, when you write a piece of web content, it should be about something you are knowledgeable about.

If you are a psychotherapist who specializes in EMDR, but have never done Brainspotting, don’t try to write a blog post explaining the intricate details of Brainspotting. (I’m not an expert in either, so for our psychotherapist clients, I pass the writing of those blog posts to one of our all-star copywriters.)

As you are creating your content strategy and your blogging calendar, try to include blogs that are timely and relevant, but make sure you feel comfortable actually sharing information on them.

A 2,500 blog post may seem daunting as you are getting started, but it really doesn’t need to be when you follow the tips outlined below.

Tip 1: Once you have your topic, see what other articles have been written about it

Before you even get in the writing zone, do a quick Google search about the topic you want to write about. Remember, you want to get a sense of what those related keywords are to include in your content anyways, so this step has a dual purpose.

For this post, my search was for Write a Good Blog Post Quickly.

Guess what comes up?

A blog titled 5 Ways to Write High-Quality Content – Fast

5 Ways to Write High Quality Content Fast

Hey! That looks right on the mark for my blog post.

Ehh, actually after a quick read-through, this blog doesn’t include all the information I want to, but that’s okay! I know it is highly ranked on Google for my proposed keyword and includes super basic topics:

  • Have a brainstorm of ideas you can pull from
  • Batch your time
  • Know your own self and when you are most creative
  • Write ahead
  • Keep it simple

These are great tips, but again, I want to be more technical in this blog post on easily creating systems for writing a blog post quickly.

Don’t worry, my efforts to research what other people are already writing haven’t gone to waste.

If you do find a blog post that nails your topic on the head, make a quick note of the outline they follow including:

  • The headers they use
  • What keywords or topics stand out
  • The general flow

Then … CLOSE THE WINDOW. This is your blog and you need to make sure you aren’t plagiarizing. You want to make the blog post your own not a word by word replica of what you just read.

So why is it okay to open up an article or two that just don’t include the information you want to include? Well… It could be that you want to write about something completely off the grid or it could be that nobody has actually taken the time yet to post a detailed enough guide on the topic you want to explore.

If I open up an article that just doesn’t seem to include the information I want to share, I take a moment to consider what I would include in my blog post that is missing from the blog I just read.

Not sure what Keywords to include in your Blog?

* indicates required


Tip 2: Take a Moment to Write Down What is Missing from the Blog Post you just read

Let’s go back to 5 Ways to Write High-Quality Content – Fast. Though the author has some great content tips, he’s missing some major items that help me write my own blog posts effectively.

Namely, the author is missing the steps to:

  • Research what other pieces of good content are ranking on Google
  • Create an outline for your blog post
  • Transcribe audio or video to create not only great written content for your website, but also to include multimedia in your blog posts.
  • Include filler adjectives and words
  • Outsource writing for blog posts

The post also has an incorrect fact about how short, concise content is the way to go. You don’t want to ramble on and on, but you want to give valuable information that will actually benefit the reader rather than a quick 300 word blog post (I’m already at 800 words and only on tip 2 for writing high quality blog posts quickly… you better buckle up).

Creating a list of what is missing from the example blog posts will help you create an outline for the informational blog that you want to write for your website.

Tip 3: Write down an outline for the content you are writing for your blog post

You now have the list of elements that are typically included in blogs related to your chosen topic.

You also have the specifics that are missing from the posts that you would like to include in your blog post.

AND, from before you even started your blog, you have the keywords you wish to include and the related keywords from Google.

Even though you already have this information compiled, I always find it helpful to write an actual outline for your blog post.

Why?

There are a number of reasons why you should, but most importantly it is because:

  1. You are a busy professional who will get called into a meeting or be interrupted by a conference call.
  2. You are a mom (or parent) like Amber and myself who will need to change a diaper, make sure homework is getting done, or run their child to T-ball.
  3. Do you really have the focus to write 2,500 words in one sitting?

As you get interrupted, it may feel like you can jump right back into the task at hand, but in reality, it takes your brain a few moments to get back on track and figure out where you are with your blog post.

Creating an outline allows you to more easily spend 15-30 minutes here and there on the blog without out feeling like you are spending half the time rereading what you’ve already written and trying to decide where to go next in the blog post.

Having an outline also keeps you on track for the final parts of your blog. Many writers often cut their blog short towards the end because they are just over the process of writing. Having an outline allows you to take a break, but not loose focus.

This process is called Batching your time (see I am including some of the information from the blog post example).

Tip 4: Batch your time while you are preparing to write and actually writing the blog post for your website

As I just mentioned, batching your time is the process of focusing on one at a time rather than trying to multitask.

Here, it means not checking your email or jumping to Facebook while you are writing.

Each time you shift your focus, your brain needs to reorient itself.

In the process of writing your blog post for your website, there are some things you can do to help you batch your time:

  1. Focus on each step in sequence: Keyword research and finding related keywords, researching similar blog posts, creating your outline for your own blog, actually writing the blog, going back and editing the blog, finding images for your blog, writing the title of your blog post.
  2. Don’t try to edit your blog post until you’ve gotten all of your information down.
  3. If you realize you need more information to write thoughtfully on a topic, but you’ve already done your initial research and are in your writing stage, make a note and then jump to the following section that you can write about. Unfortunately, if you jump back to reading articles, trust me, your blog will take 10 times longer to write.
  4. I’m sure I have more, but because I am using this blog as a way to show my own blog writing process, I’m jumping to the next section because additional points are not coming to me at this time. I may come back and add them, but for now, I move on. 🙂

So again, you want to think of writing your quality blog post as a process. Just like anything else in business, processes help to make you efficient and effective. Batching is one way to help you write your long blog post quickly.

Tip 5: Don’t Write! Transcribe from Audio and Video to Create your Blog Post

This is one of my favorite tips for busy professionals who just don’t seem to have the time to get into a writing groove.

10 minutes of audio creates a blog that is about 2,500 words long.

So, after writing your outline for your blog post you could use an audio converter or record a video to transcribe your words to text to include in your blog post.

Some tools I recommend are Google Docs and YouTube.

Let’s take a look at Google Docs first. 

Head on over to Google Drive and click to create a new document. Better yet, you could create your outline as a Google Doc so you can add to it on the go if needed.

Under Tools, there is an option for Voice typing (Ctrl+Shift+S).

voice typing google

Click this, start talking, and your document will start filling up with words.

Now when I do this speech to text, I do find that I need to edit the text as I go. I’ll talk for about 5 sentences, stop the recording, and then edit what was written. You may be able to do the entire document based off your outline and notes, however.

The iPhone speech to text works well, as well. I’ve actually ‘written’ blogs while out for walks with the girls, but Apple will stop transcribing every couple of minutes, so you need to make sure you don’t keep talking with nothing being written down.

I’m sure there is other software you can use that also records your audio for use in a Podcast. Or you can send the audio file off to Rev.com for transcription at $1/minute. Totally worthwhile if you have spent hours trying to get into writing, but not filling the page with any content.

The other option is to use YouTube to transcribe a video.

Using your computer camera or your phone, record yourself talking through the outline you created.

When you upload your video to YouTube, you may need to first verify your account (enter in your phone number in the settings) to post videos that are over 10 minutes long.

Typically, most of our clients who generate a transcription of their blog upload their videos as Unlisted or Private, though I am all for listing these videos as Public to get more of a reach – blogs with videos perform really well, YouTube is a search engine, and you can share your video to social media (always think of how you can repurpose your content as you create it). Make sure the space you are in looks professional if you also plan to publish the video as Public and include it in your blog post.

After you have uploaded your video, click in to edit it and find the link that says Subtitles/CC.

youtube subtitles

You will be prompted to select your language (I use English though at times I’m not sure).

Then, click under Published where English is listed again.

subtitles for youtube

On the next screen you can download the subtitles created by YouTube as .srt.

save subtitles you tube


I’m not sure what a .srt file actually is, but all you need to do is convert it to a .txt file online and you will be able to open it with your computer. In the past I’ve used Subtitle Tools for the conversion, though a Google search for “Convert .srt file to .txt for free” will work just fine.

The text that is created will be formatted a little strangely with about 7 words per line and no punctuation. Honestly, I get a little overwhelmed by this, but the ability to create the video and written blog in one go is well worth the effort to run through your post and edit it.

Your outline makes this easier as well. 

You can work through small chunks and sections by pasting the text under the corresponding blog header. Please let me know if you often work through your transcripts, I’d love to feature more tips about converting a YouTube video into a blog post.

Again, if spending $10-$20 isn’t a problem, you can submit the video to Rev.com and utilize their transcription services.

Tip 6: Outsource your Blog Writing

We frequently outsource blog writing. I’ll keep this section short, but you can find experts in your industry who cost anywhere from $0.03 per word to $0.65 or more per word. So, depending on your budget and time you have available to provide an outline and edit your blog post, you may decide for yourself what budget for the blog writing really makes sense.

We utilize freelancers on Upwork.com and WritersAccess.com to find niche bloggers for our clients. Again, as I mentioned earlier, I’m not an EMDR or Brainspotting expert, so why would I spend hours trying to write that blog post when someone else can write it for a fraction of the cost of my time to research.

Depending on your industry, you can also probably find Guest Bloggers who would write a post on your site for free if they can include their bio and a link back to their own website.

With Guest Bloggers, just make sure their content is unique and reserve the right to edit it slightly so the headers include your focus keywords and related keywords.

I love guest bloggers because they often then will share the link to their own networks or link to it from their website, which then in turn helps get new visitors to your website and helps in SEO.

How to quickly write a great blog post for your business, #blogging #bloggingtips, learn how to write a long blog, how to blog for your business, blogging for business

How to quickly write a great blog post for your business, #blogging #bloggingtips, learn how to write a long blog, how to blog for your business, blogging for business, #business

Wrap Up

Writing a high quality, long blog post doesn’t need to be a difficult task. Depending on how you work you may find that you are better suited to transcribe and audio or video file rather than sitting down and typing.

The most important starting point for any blog, however, is to make sure that you create an outline. I just sat down and busted out this blog before 9am, but it is on a topic I am VERY familiar with (have you checked out our blogging course yet?).

You may not have time to finish a blog in one chunk, so be sure to batch your time to most effective and efficient.

What long blog posts are you working on writing? I’d love to check out your work!

Not sure what Keywords to include in your Blog?

* indicates required


Interested in learning more? Take a look at these articles:

Blogging in 2017 – The Startling Truth About Blogging

Blog SEO Checklist

4 Reasons Why Contests Should be a Part of Your Marketing Strategy

By Christina Savage
Owner & Technical Consultant
Christina Savage, LLC

In late summer 2016, I jumped off a metaphorical cliff. I quit my six figure, salaried management job to start my own software consulting business from the ground up.

As a single mom of a 9-year-old son and the sole earner in my household, taking this leap posed a significant risk. Given this fact, you’d think I would’ve created an elaborate business plan, but I didn’t; I just rolled up my sleeves and got started.

But, why?

After years of working in high-pressure software and IT management roles, I was ready for more autonomy and flexibility. I wanted to build something all by myself. Starting a business is, in my mind, a creative process – and I desperately needed to create.

How I got started

In the software world, there’s a saying, “fail fast, fail cheap.” I knew that if I over-thought things, I’d never start. So, I just started getting things done. As an example, I didn’t create a fancy brand; I just used my name as my company name.

christinasavagewebsite

Here a few practical steps that will help you start a service-based business:

Buy a domain name

I bought my domain name from GoDaddy, but there are a lot of domain name registrars out there. It’s fast and easy and will typically cost you less than $20.

Name your company and register it with the state

I formed an LLC by registering it with the state, paying the fees, and filling out the required paperwork. Visit your state’s Secretary of State website to find out the process. Depending on your line of work, you may also need a business license.

Set up a mailbox

I bought a P.O. Box at my local post office, but I’ll likely move to a virtual postbox in the future.

Set up a business phone line

I knew that I didn’t want my personal cell phone number posted publicly, so I set up a Google Voice number. It’s free and forwards all calls to my cell phone. If you plan to build a business with more than one person, be sure to look into other VoIP options like Grasshopper or Fluentstream.

Create a logo

I hired my graphic designer friend to create a logo for me. I love it and I have it on everything – my website, my business cards, my invoices—you name it.

Hire a professional photographer

I hired a professional photographer to take headshots and I used them on my website and LinkedIn profile. Professional photography makes a huge difference, especially when you work with people who find you online.

Launch your website

Even though I’m technical and I’ve worked on a lot of websites in the past, I’m not a website designer. I knew that I’d spend too much time banging my head against the wall over my website theme and design if it was too customizable, so I just went the quick and easy route and chose Squarespace. It’s affordable and really easy to use. In the future, I’ll likely move to WordPress because I think it will scale best for me and offer me better SEO, but for now, Squarespace works.

christinasavagewebsite

Set up your email

I’ve always been a fan of G Suite because I love the Google platform. I’m a huge proponent of a paid email platform, as opposed to using a personal @gmail.com account. It’s one of the most critical tools in your business. Plus, G Suite makes it easy add and manage users and it offers some of the best collaboration tools on the market. My Google Drive files are well-organized, allowing me to keep my personal and business documents separate, but to also access my documents at any time, from anywhere, and on any device.

Get your financial tools in order

Set up a business bank account. Be sure to keep your expenses separate from your personal expenses. If you decide to move to an S Corp or other type of entity in the future, you’ll need to keep these separate anyway.

It’ll make accounting a lot easier, too.

Set up a cloud-based accounting software. I use FreshBooks and absolutely love it. It’s made for entrepreneurs and small business. It allows me to track my time in real time (I typically charge hourly), quickly generate invoices, and automate payment reminders. It’s also integrated with my bank transactions and credit card gateway. Plus, their support is outstanding. Having FreshBooks allows me to spend only 10 minutes per month on invoicing.

Finally, consider getting business insurance. Many clients may require it.

Start using a CRM

Customer Relationship Management (CRM) software is a central database to track client communication. I consider it the ‘brain’ of my business. Most CRMs integrate with website forms, sales and marketing tools, accounting software, and reporting dashboards. My CRM allows me to track my prospects, organize my projects, build reports, and market to my clients. It’ll also allow me to easily onboard and communicate with future employees.

These initial steps took me about two weeks. It doesn’t take much. Just start!


How I grew (and the emotions that ensued)

Once I set up my systems and processes, I had to figure out how to get clients. I’ve never considered myself a salesperson and I’m not into self-promotion. However, the primary skill that’s contributed most to my career success has been my ability to build and maintain relationships.

I’ve kept in touch with everyone over the years—former coworkers, employers, employees, clients, and vendors. So, when I started my business, I reached out to everyone. I scheduled coffee meetings and a lot of phone calls. This quickly led to a couple of key software partnerships, including my CRM software partner – a referral source that contributed 48 percent of my revenue last year. Other significant projects and clients came from referrals from friends and former clients.

I don’t mean to make this process sound easy. It took a lot of work and even more persistence. There were many days when I literally had no projects. I spent about eight months dipping into savings before my revenue became significant.

I also had a lot of job offers and people trying to get me to come work with them. As someone who’s used to saying ‘yes’ to almost everything, I had to say ‘no’ to a lot of great opportunities and stay focused on my goal of building a business.

systematize your business

What I’ve learned

Once the momentum starts, it keeps going. There will be many days in your journey when you have no idea where your money will come from next month—when your projects wind down and you have few opportunities in the pipeline. It’ll be scary, but you need to keep moving forward. Schedule more coffee meetings, attend a local networking event, reach out to an old colleague, or teach yourself a new skill. If you keep the momentum going, your business will continue to grow.

business organization

Structure your day. Even though you may want to sit around in yoga pants all day—and will probably do that most of the time—you need to stay focused. If you work best in the morning, do your most important work before noon. Schedule your meetings, calls, and business development tasks in the afternoon.

Do great work. You have to put your clients first. Make it as easy as possible to work with you. From your contract to the way you accept payment, it needs to be easy. I accept credit card payments from my clients and I wouldn’t dream of passing through the transaction fees. I invoice clients once a month, my time records are clear and detailed, and I give my clients 30 days to pay. Trust is key.

Systematize everything. Even though you may be starting out as a solopreneur, you may bring on employees or consultants in the future. The more clearly-defined systems and documentation you have in place, the easier onboarding and offboarding will be. Even if you just need to hire a consultant, you’ll save yourself so much time and money if they can easily review your documentation and devise solutions for you. Trust me on this.

Say yes. In the beginning you’ll say yes to almost any work that comes your way. As you grow, you’ll need to start learning how to say no and specializing, but the work you do in the beginning will teach you so much. You’ll also get used to facing brand new problems. Every. Single. Day.

You’ll have to tackle projects you’ve never done before. I’m not sure this ever stops. You’ve gotta be confident that you are smart and you’re a problem solver. In the words of Marie Forleo, “everything is ‘figureoutable.’” Don’t shy away from hard things. Focus and figure it out. You’ll get there. I promise.

You’re going to wear #allthehats. I run my business by myself. I’m the business development rep, sales rep, sales engineer, proposal writer, project manager, technical lead, researcher, marketer, visionary, customer service rep, tester, bookkeeper, and accounting department. I even did my own taxes the first year. Because I worked for small, lean businesses for years, I had experience in all of these areas. If you don’t feel comfortable doing these tasks, delegate or outsource them so you can focus on the highest and best use of your time.

Stick to your vision. As I previously mentioned, I received many job offers and invitations to discuss employee-type roles. It’s flattering and sometimes tempting, but I’m proud of what I’ve built—there’s no salary that could pull me away from doing my own thing.

Track your progress. For me, tracking my revenue is an easy metric to monitor. It took me 8 months to start making consistent and sufficient revenue. I gave myself many pep talks and I had to look at my consulting revenue chart every single month to prove to myself that my revenue was trending up. These trends showed me that I actually had a viable business and that I wasn’t blindly following a dream. Supportive friends and family are also key!

Where I am now

More than a year-and-a-half in, I’ve got 28 clients in 12 states and three countries. I’ve provided consulting on CRM, Enterprise Resource Planning (ERP), call center, and help desk software. I’ve written enterprise software manuals and marketing collateral, and I’ve managed a few big projects. And now, I’m starting to narrow my focus to the services I enjoy the most.

growthchart

I’m starting to consider re-branding and doing some marketing campaigns. To date, I haven’t done any marketing besides partnering with a few software providers.

I also started working with a CPA to reduce my tax liability and I put myself on payroll (yikes!). Finally, I’m focusing on larger, longer-term projects and building a recurring revenue model.

My current areas of focus are intended to help my business grow and reduce the chance that I’ll burn out over time. Next year, I may be focused on completely different objectives. It’s critical to be able to pivot and scale as your business grows.

“A year from now you may wish you had started today” – Karen Lamb

If you’re eager to start your own business, just start with the steps outlined in the “How I got started” section. Take one step forward every day. You may be surprised where you’ll be a year from now. Good luck!

Any questions? Comments? Get in touch! I’d love to hear from you.

Interested in learning more? Take a look at these articles:

How Social Speak was Born

5 Social Media Goals To Get You Started

Defining Your Core Values


How I jumped off a metaphorical cliff to start a successful software consulting business, #business, #momprenuer, how to start a business, steps to start a business, how to become a mompreneur, tools to use to start a business

How I jumped off a metaphorical cliff to start a successful software consulting business, #business, #momprenuer, how to start a business, steps to start a business, how to become a mompreneur, tools to use to start a business

What’s all the hoopla about hashtags?  When it comes to social media, hashtags are a BIG deal!  They are the key or more appropriately, the “link” to helping your target market find you.  

How “#” Hashtags Work:

If you click on any given # in a social media post or enter it into a social media search bar, instantaneously, you will receive all of the most recent posts and content that have been “tagged” with the hashtag word or phrase you clicked on or entered.  For example, if you are using Instagram and you type in the search bar: #SocialMediaRocks you will see there are over 1,200 posts you can read that are all about the topic “Social Media Rocks.” This same practice can be used on all the major social media platforms including Twitter, Facebook, Pinterest, and LinkedIn.  Fun Fact: Twitter is considered to be the “birthplace” of hashtags. Due to the way Twitter operates and the enormous amount of “Tweets” that are posted every second, hashtags are critical in order to keep up to date and track the content available surrounding a certain topic, trend, conversation, event, or issue.

How Should You Use #s For Your Business?

This is a common question we get asked…a lot!  The good news is, we have answers for you! We recommend you break down your hashtags into 3 major categories.  Those categories are:

  1. Branded Hashtags – certain words or phrases that specifically describe your brand.  Stumped on what you would use for branded hashtags? See if you can guess the brand behind these hashtags:  #ShareACoke, #ShamrockShake, #MacchiatoMondays
  2. Industry Hashtags – use hashtags to describe the industry you are in.
  3. Trending Hashtags – use hashtags that are trending as long as they are relatable to your business or the content of your posts

Hashtag Research

Finding industry hashtags and trending hashtags requires some work but we have some resources to help you.  Below is a list of resources to help you find the perfect hashtags for your posts:

  • Be a stalker – this is the one time it’s ok to stalk people on the internet.  Find out what industry influencers are using as hashtags in their posts. Chances are if an industry influencer is using the hashtag, it’s trending!
  • Hashtagify.me – is a great tool to see what is trending in your niche and to get hashtag suggestions
  • Hashtags.org – use this tool to find trending hashtags
  • RiteTag.com – this tool will provide suggestions and tell you which social platform the hashtag will perform its best on

The best way to optimize your hashtags is to really understand your business, who your business attracts and how to speak your tribe’s language.  Once you figure that out, you can design and craft the perfect hashtag words and phrases to attract them.

Hashtag Best Practices & Tips:

  • Create 3 types of hashtags for your business (branded, industry, and trending)
  • When using hashtag phrases, use capitals to separate words, example:  #SocialMediaRocks
  • Avoid including #hastags in the #middle of #sentences as it #makes your #content #difficult and #unpleasant to #read
  • Instagram will accept up to 30 hashtags per post, post these in the comment section below your post content
  • When posting hashtags on Instagram, avoid using the same hashtags over and over again as it will hurt your rank.  The Instagram algorithm treats repetitive hashtags has spammy practices (a.k.a. “shadow banning)
  • Always include content in your post.  Refrain from just posting a string of hashtags.  Your followers won’t appreciate it and they will begin to unfollow you

Download our hashtag organizer by clicking HERE

Happy Hashtagging!

Did you know?  Pinterest is the 3rd most popular social network and it has become a huge search engine!  People turn to Pinterest on the daily to:  shop, find information, ideas, educate themselves, organize themselves and so much more.  Once you get to know Pinterest and all that it can provide for you, the love affair begins 😉

To make sure your brand’s content hits the ground running, there are some basics you need to have in place, especially when it comes to graphics.  Pinterest is a highly visual platform.  Understanding the best graphics to use on the site is key to making your account perform its best.

We want to make sure you and your brand look your best on Pinterest, so, we put together this helpful 2018 Pinterest Image Size guide.  Download it, print it out, and keep it handy so you can have these image sizes available at-a-glance!  Download the guide HERE.

Part of being successful on Pinterest requires your ability to be found!  That’s where hashtags (#) come into play.  Once you have an understanding of how to utilize hashtags, you will notice an increase in your Pinterest traffic.

Hashtag Know How!

Here are 3 strategies you can use to get your hashtag game in place for your brand

STRATEGY #1:

Know the number of hashtags you can use one 1 pin.  A recommended rule of thumb is to use no more than 20 hashtags per pin.

STRATEGY #2:

Always use hashtags on the pins you post.  When people search hashtags in the search bar, Pinterest will compile the latest pins chronologically, placing the newest pins at the top of the list. That’s where you want your pins to live.

STRATEGY #3:

Organize a list of hashtags for your brand.  Categorize you hashtags into 3 buckets:

  1. Branded Hashtags:  a list of hashtags that only relate to and describe your brand
  2. Trending Hashtags: a list of trending (popular) hashtags on the topics you post about (these hashtags will frequently change based on the topic and current trends you are posting about)
  3. Content Related:  a list of content related hashtags to use in order to describe the post you are pinning

Best Practices When Selecting Hashtags:

  • Avoid using very broad hashtags, be more specific and try to think like your audience.  What hashtags would they use to find your pin?
  • Don’t be afraid to use hashtag phrases if they help to define your audience even better.  For example, we may use a hashtag phrase like #SocialMediaTraining as a hashtag to reach our audience.
  • Do some research!  When adding a hashtag to a pin on Pinterest, Pinterest will populate a list of suggested hashtags.  Next the hashtag, you will see how many pins are using the hashtag you are considering.  If the number is HUGE, your pin may get lost in the shuffle.  Try to determine how you can make your pin more niche with a more specific hashtag or hashtag phrase.

When working with Pinterest, our best advice is for you to get started, have fun, and experiment with different ideas, strategies, and tactics.  Happy pinning!

We are going to be talking about Pinterest for digital marketing for your business. Now is such a great tool for businesses to use for their marketing because it allows for your business to gain a broader audience without necessarily having to always wear to grow your network. Pinterest works much more like a search engine in this capacity rather than a social media Network.

What is Pinterest?

First and foremost, what is Pinterest? Is an Application that utilizes images to help people find things online more easily. So you can think of it almost like a visual search engine. Imagine if you did a Google Search and rather than having websites come up in text and phrases, the websites all appeared as images. This is Pinterest. Now with Pinterest,  users are prompted to search for items of interest and organize them in elements called boards. Board is a collection of that all relate to a certain topic. As a business you are able to Showcase elements from your own website as well as related pins from other people’s website so that your followers and the people who come across your account can more easily find information regarding the topic of your expertise without having to search around for related website and phrases.

The download for this week is to help you organize the boards on your own business Pinterest account so that they relate to items that your target market will be finding online. The link for this is at the bottom of the blog.

Now you might be thinking that Pinterest is only for a DIY, crafts, and Home Improvement projects, but in reality, it is for so much more! We have found that everything from business services and tips to graphic design and accounting for businesses have garnered lots of great feedback and traffic to our client’s websites. In fact once a pin goes viral, you can find that you consistently get leads that come from one blog post image on your website month after month.

We haven’t really discussed in detail the use of lead capture forms on your website, but Pinterest is a great traffic source if you have a lead capture form and free giveaway on your website as a way to attract new people to your email list.

When you utilize Pinterest it is important to make sure that your pins correlate with a Content that you find on your website and that your pins and board description include the keywords that you need to be found just as you would a search engine.

How do Search Engines Work (How Google Ranks Pages)

How search engines work is through matching the search user’s intent would be words that appear on a specific page on your website. If the search user intent and the keyword phrases that are used match the content that is found on your website you are more likely to appear in organic listing.

The same is true for Pinterest. As you are creating every single pin from your website you need to make sure that you are thinking about words and phrases that somebody might be using on Pinterest.

How to Organize Your Business Pinterest Account

We’ve recommend following these steps to ensure that your Pinterest account Boards are set up for success.

First step is to create boards that align with the interest of your target market on Pinterest. You want to make sure that these boards closely relate to your own business so that you can include a combination of pins from your own website as well as from other resources online.

When you create your boards, think about the different aspects of your business. For us, for example, we can pin about:

  • Blogging,
  • Business Tips,
  • Productivity,
  • Email Marketing,
  • Web Design,
  • Branding,
  • Social Media, etc.

Each of the boards we will want to pin very specific pins to that align with the board theme.

From here, you will want to make sure your Boards have descriptions that align with what a user will find pinned, as well as a list of the keywords that will help someone find the board.

Then it is time to get pinning! Don’t only pin from your own website, you also want to search for popular pins on Pinterest to Repin to your boards. It is best if these are popular pins because they will then help boost your own engagement and reach on Pinterest. Best of all, when your boards are well organized and the descriptions include keywords, your boards may even show up in Google Organic results, too!

We’ll be sharing more tips about including Pinnable images on your website and blog, but as a quick refresher, these should be tall images (735px x 1104px to 2061px).

I’ve put together a guide for you to create your own outline for your boards on Pinterest. Within this guide, think about the keywords you would expect someone to use to find this board (you’ll want to include these keywords in both the Pin Descriptions and in the Board Description), the Topics you want to include in the board (for example I group all social media together rather than having a board for each network), and your goals for the board with how frequently you hope to pin to the board so you can keep consistent.

Download your Weekly Prompt Here

Is 2018 your year to tackle social media and create campaigns that your business benefits from it?  If you answered YES!, this blog post is for you!  We will review common mistakes businesses make as they craft social media campaigns, tips to use as you are defining your goals, and 5 measurable goals you can use to determine whether or not your social media campaigns are effective.

A Common Mistake Businesses Make…

Jumping into social media without identifying goals or measuring successes is a common mistake many businesses make and it leads to a very frustrating social media experience.  Many who jump into social media for business without a goal or without a plan tend to throw up their hands and give up stating that they threw away their money and social media just doesn’t work!  Don’t let this happen to you!  Read on…In this article, we will explore 5 of the most common goals people measure when using social media.  

“What gets measured, it what gets done”

Measurement is the key to anything you do!  If you can measure your social media progress and outcome, you will know the strategies and tactics to put in place

Here are some tips and things to think about before setting goals for your social media campaigns:

  • Make sure your social media campaign goals are in line with your overall business goals
  • Select different goals for different social platforms – not all platforms will yield the same results
  • Select goals that make sense for the social media platform you are using
  • Choose goals that are measurable
  • Track your progress

What Should Your Goals Be For Social Media?

5 sound goals you should set and strive and how to measure them are listed below:

  1. Brand Awareness – Brand awareness can be measured in terms of:
    1. Fan followers.  Create a stair-step approach when it comes to tracking brand awareness.  A common goal to start with is to gain your first 100 followers and build from there.
    2. Reach – how many people did your message reach (a popular Facebook statistic)
    3. Mentions – how many times is your brand tagged or talked about in other social media posts
    4. Shares – how many times were your posts shared
  2. Website Traffic – Make sure your web designer has installed Google Analytics on your website.  This will help you track how much traffic is coming from social media platforms and channels.  Monitor the progress on a consistent basis and set goals based on the traffic trends you see.
  3. Website Loyalty – How loyal are your customers?  Do they review what you are talking about on social media and then click through to your website to get more?  Google Analytics can help you measure repeat visitors.
  4. Brand Engagement – This is a popular social media result that many measure.  Based on the comments, likes, and interactions your brand receives you will be able to understand how your brand is perceived, the level of brand loyalty your company has, and the community your brand is building.
  5. Conversions – How many people saw your social media posts and then converted into paying customers.  Again, this will be measured by Google Analytics, letting you know how many sales were a result of your social media campaigns.

There are many more things you can measure through social media.  It all depends on why you are there.  It could be anything from “How many times did my phone ring?” to “How many people clicked through to my lead generation form?”  Take the time to really think about why you want to be on social media.  Once you determine why you want to be there, build your campaigns around the reason.

Need help tracking your results?  Download our tracker by clicking HERE.

WOW, can you believe it is already the 22nd of January? Where has this month gone?

I hope you have had the time to write down your SMART goals, we have given you so much useful information to really make 2018 a success! Sometimes writing down your goals is the easy part, right? It is actually working towards them and tracking them that can be the challenge.

By the time April comes around people are usually way ahead of the game or have fallen back to their old routine. We have done some research for you to find easy and convenient ways to track your goals, so at the end of the year, you can look back at all you were able to accomplish!

Sometimes people feel that our phones can be a distraction to our lives, which I would agree. At the same time, we can use them for good and help us stay on track of our goals! Our phones are usually something that is ALWAYS with us, by our bed, on our desk, in the car, at the gym, wherever and whatever you do during the day, your phone is probably close by. Whether you are wanting to track personal goals or business goals, it is important to be able to monitor your success.

We have found 3 apps that you may enjoy to keep track of your goals:

Strides

We have really nailed down your SMART goals for this year, using this app Strides your can Track all your Goals & Habits in one place. Always stay motivated and on track with flexible reminders and beautiful charts to help you achieve your goals.

SMART Goal Setting
Track more than habits. Set Specific, Measurable, Achievable, Relevant & Timely goals too:

Target value by date
Set a goal to increase or decrease anything, and see your pace, projection, and daily goal.

Average over time
Keep tabs on your average per day, week, month, year, or rolling (e.g. Last 7 days).

Project with milestones
Break a project down, and always know if you’re on pace to complete it by the due date.

Time Planner

This is a great app to be able to create all those lists you like and be able to check them off! You can track your goals, lists and habits with TimePlanner.

Do you also keep planning 100 things a day to see you accomplish maximum 10 in the end?

Does your time fly very fast as well?

Have you ever thought, where it has disappeared?

Quit wondering where see it with your own eyes!

This application that helps you to increase your productivity, organizing your days, weeks, months and years, and provides the opportunity to improve your planning skills and to commensurate your strength and capabilities. Boost your effectiveness and productivity in different areas of life!

Why this App?

  • Fast and optimized time management tool
  • Absolutely no ads (seriously!)
  • Convenient schedule with timeline and part of the day modes
  • Easy time tracking with bubbles
  • Handy customizing with loads of icons and colors
  • Two types of intents – goal and ritual
  • Reminders of different types
  • Task priority marks
  • Notes for categories, activities and tasks
  • Alarm + captcha to fight procrastination
  • Moon calendar
  • Backup

Google Goals

Who else LOVES Google calendar???? This one I think may be my favorite for goal tracking.

Find time for your goals with Google Calendar

Whether it’s reading more books, learning a new language or working out regularly, achieving your goals can be really hard. One day it’s “I got called into a last-minute meeting.” The next day it’s “I have a friend in town.” And before you know it, your goals are delayed or forgotten. In fact, with all the things you need to do in a given week, it’s probably harder than ever to find the time—even when your goal really matters to you.

That’s why starting today, we’re introducing Goals in Google Calendar. Just add a personal goal—like “run 3 times a week”—and Calendar will help you find the time and stick with it.

Goals are easy to set up

To set a goal (like “Work out more”), simply answer a few questions (like “How often?” and “Best time?”), and you’re all set. From there Calendar will look at your schedule and find the best windows to pencil in time for that goal.

If you still LOVE to write down your weekly or monthly goals and be able to look at them on a daily basis, don’t worry, we have you covered as well. Below is a checklist you can write down your monthly and weekly goals and then input the action items you need to make to complete this goal.

Download your checklist here